ShardingSphere是一个开放且活跃的社区,非常欢迎高质量的参与者与我们共建开源之路。
您可以从订阅官方邮件列表开始参与社区。
在成为一个贡献者之前,请您阅读贡献者指南、官方文档指南以及开发规范。
如果你想成为官方提交者,请您阅读提交者指南。官方提交者需要通过开启 2FA 后,才能够行使 Apache 官方代码仓库权限。
如果你想成为官方版本发布经理,请您阅读发布指南。
感谢您关注ShardingSphere。
合集目录

ShardingSphere是一个开放且活跃的社区,非常欢迎高质量的参与者与我们共建开源之路。
您可以从订阅官方邮件列表开始参与社区。
在成为一个贡献者之前,请您阅读贡献者指南、官方文档指南以及开发规范。
如果你想成为官方提交者,请您阅读提交者指南。官方提交者需要通过开启 2FA 后,才能够行使 Apache 官方代码仓库权限。
如果你想成为官方版本发布经理,请您阅读发布指南。
感谢您关注ShardingSphere。
合集目录
在使用ShardingSphere的过程中,如果您发现任何问题,有新的想法、建议都可以通过Apache邮件列表参与到ShardingSphere的社区建设中。
发送订阅邮件。
用自己的邮箱向dev-subscribe@shardingsphere.apache.org发送一封邮件,主题和内容任意。
接收确认邮件并回复。
完成步骤1后,您将收到一封来自dev-help@shardingsphere.apache.org的确认邮件(如未收到,请确认该邮件是否已被拦截,或已经被自动归入订阅邮件、垃圾邮件、推广邮件等文件夹)。直接回复该邮件,或点击邮件里的链接快捷回复即可,主题和内容任意。
接收欢迎邮件。
完成以上步骤后,您会收到一封主题为WELCOME to dev@shardingsphere.apache.org的欢迎邮件,至此您已成功订阅Apache ShardingSphere的邮件列表。
至此,您可以通过订阅的邮箱接收及回复邮件,或通过查看归档邮件来跟踪邮件对话。
| 软件 | JDK | Idea |
|---|---|---|
| 版本 | >=1.8 | 最新版本即可 |
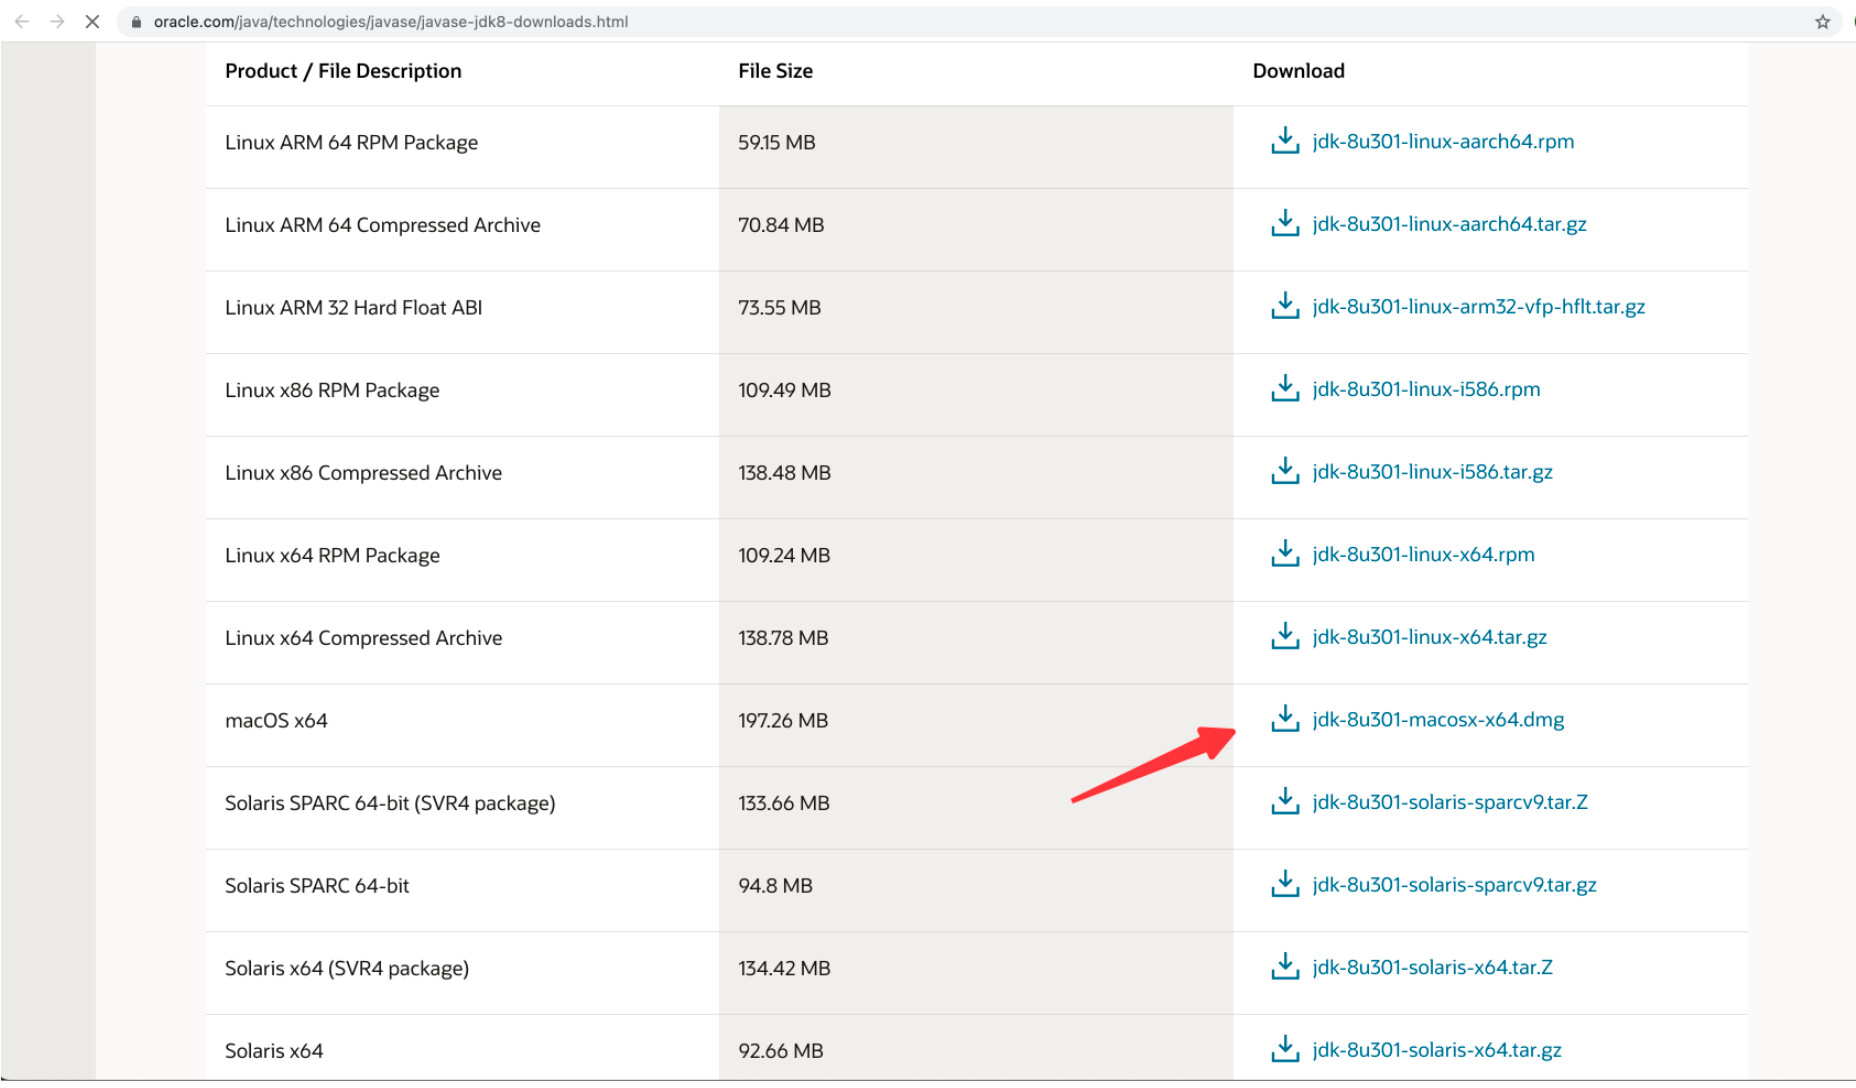
vim ~/.zprofile
#jdk环境通过 .dmg 方式安装后默认为下方路径 JAVA_HOME=/Library/Java/JavaVirtualMachines/jdk1.8.0_301.jdk/Contents/Home PATH=$JAVA_HOME/bin:$PATH:. CLASSPATH=$JAVA_HOME/lib/tools.jar:$JAVA_HOME/lib/dt.jar:. export JAVA_HOME export PATH export CLASSPATH
source ~/.zprofile
#假设项目路径为 /Users/hanmeimei/IdeaProjects/shardingsphere/ cd /Users/hanmeimei/IdeaProjects/shardingsphere/
./mvnw -Dmaven.javadoc.skip=true -Djacoco.skip=true -DskipITs -DskipTests clean install
./mvnw -Dmaven.javadoc.skip=true -Djacoco.skip=true -DskipITs -DskipTests clean install -Prelease #进入下方目录位置 cd /Users/hanmeimei/shardingsphere/shardingsphere/shardingsphere-distribution/shardingsphere-proxy-distribution/target #即可看到打包好最新的软件 apache-shardingsphere-5.0.0-RC1-SNAPSHOT-shardingsphere-proxy-bin.tar.gz
完成以上操作后,您已经有了 ShardingSphere 的软件环境,可以根据《贡献者指南》 参与到 ShardingSphere 的社区建设
您可以报告bug,提交一个新的功能增强建议或者直接对以上内容提交改进补丁。
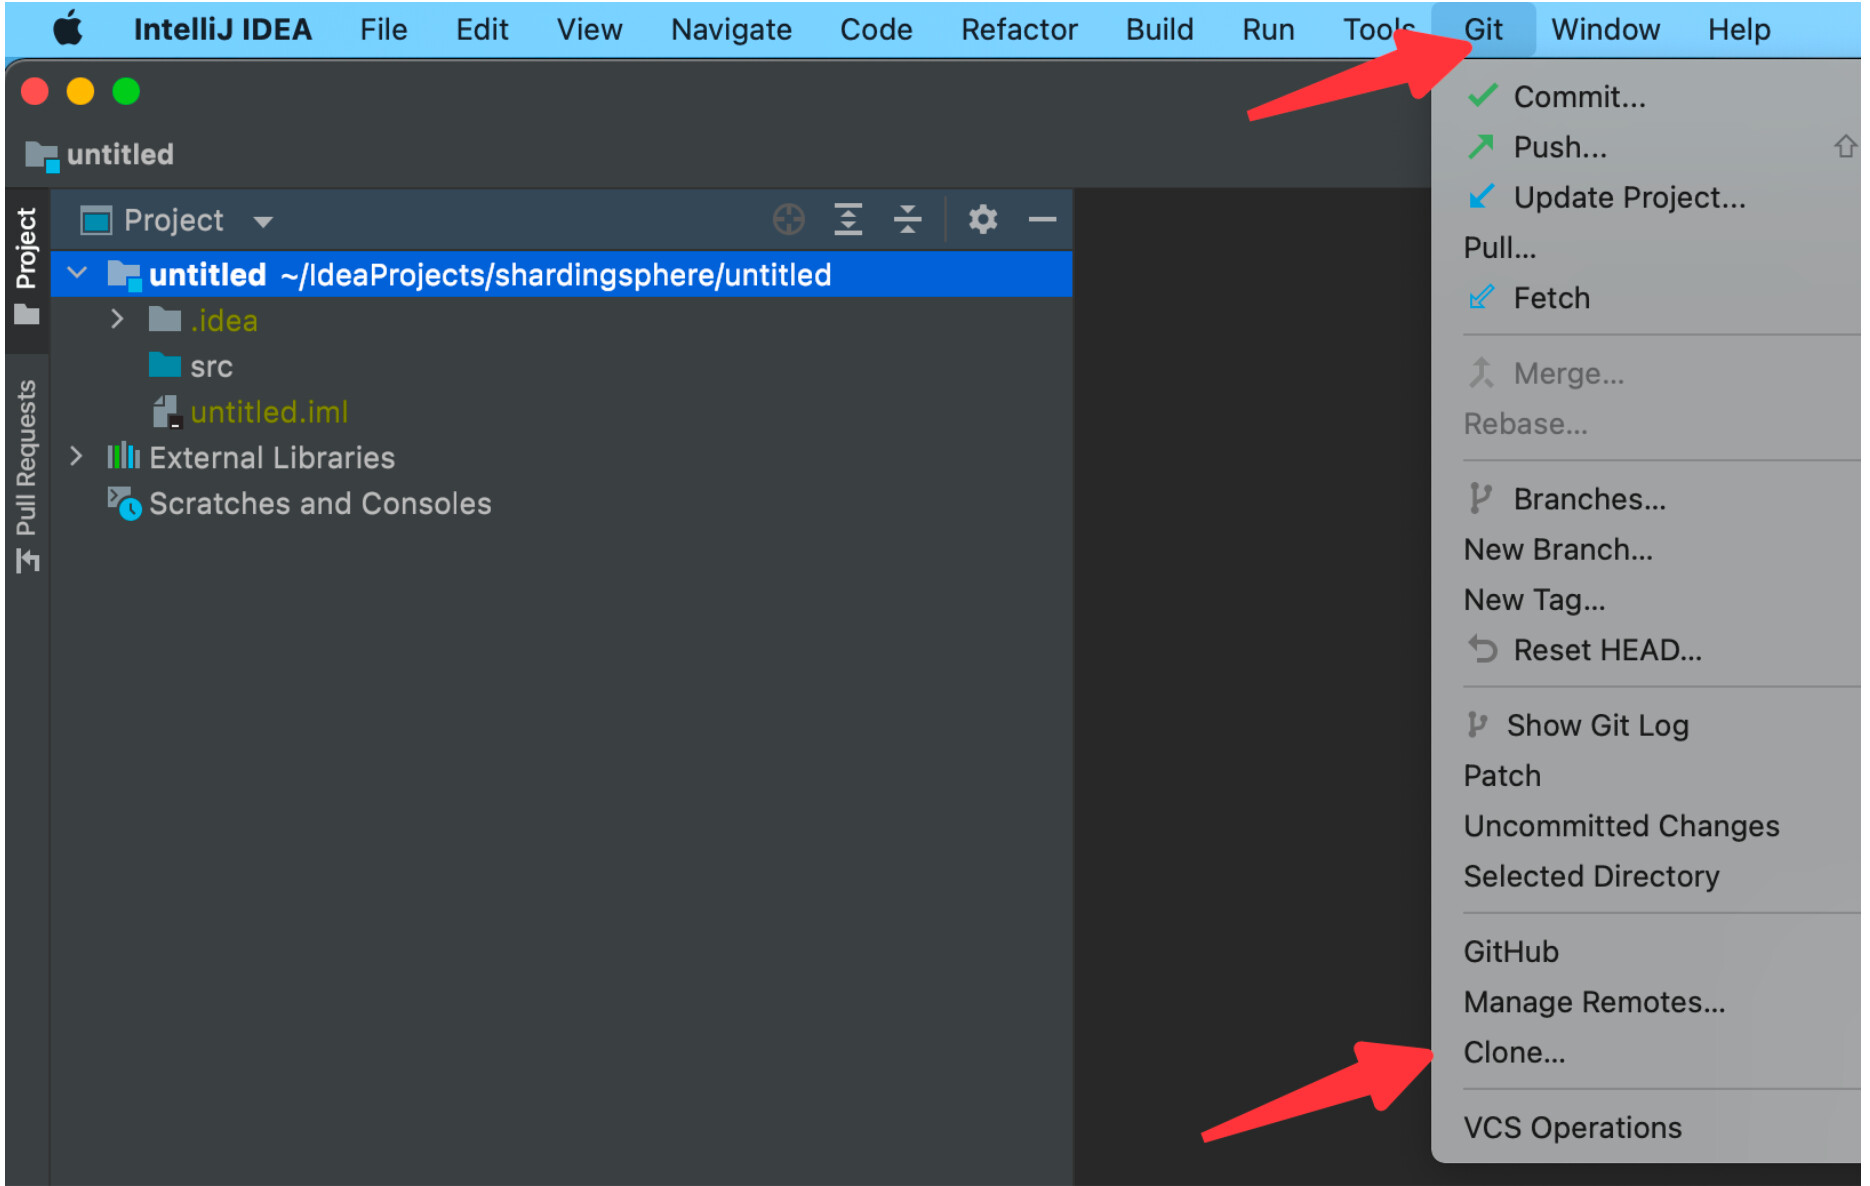
1. Fork分支到本地,设置upstream
git remote add upstream https://github.com/apache/shardingsphere.git
2. 选择issue
3. 创建分支
git checkout master
git pull upstream master
git checkout -b issueNo
注意 :PR会按照squash的方式进行merge,如果不创建新分支,本地和远程的提交记录将不能保持同步。
4. 编码
git add 修改代码
git commit -m 'commit log'
git push origin issueNo
5. 提交PR
6. 删除分支
git checkout master
git branch -d issueNo
git push origin --delete issueNo
注意: 为了让您的id显示在contributor列表中,别忘了以下设置:
git config --global user.name "username"
git config --global user.email "username@mail.com"
ShardingSphere社区遵循Apache Community’s process 来接收新的提交者。
当您积极地参与ShardingSphere社区之后,项目管理委员会和项目官方提交者会根据您的表现发起吸纳您成为官方提交者和项目管理委员会成员的流程。
Committer提交的PR,需要根据PR类型和当前发布的周期标注Label和Milestone。
Committer review PR时,可以进行squash and merge to master的操作, 如果有问题可以加上change request或者@相关人员协助处理。
| 序列 | 开始时间 | 姓名 | GitHub ID |
|---|---|---|---|
| 1 | 2021/8/16 | 潘娟 | tristaZero |
| 2 | 2021/8/23 | 欧阳文 | avalon566 |
| 3 | 2021/8/30 | 蒋晓峰 | SteNicholas |
| 4 | 2021/9/6 | 江龙滔 | RaigorJiang |
| 5 | 2021/9/13 | 孟浩然 | menghaoranss |
| 6 | 2021/9/20 | 端正强 | strongduanmu |
| 7 | 2021/9/27 | 孙念君 | taojintianxia |
| 8 | 2021/10/4 | 孙念君 | taojintianxia |
| 9 | 2021/10/11 | 钟红胜 | sandynz |
| 10 | 2021/10/18 | 兰城翔 | lanchengx |
| 11 | 2021/10/25 | 吴伟杰 | TeslaCN |
| 12 | 2021/11/1 | 蒋平川 | dachuan9e |
| 13 | 2021/11/8 | 姜茂林 | jiangML |
| 14 | 2021/11/15 | 陆敬尚 | jingshanglu |
| 15 | 2021/11/22 | 赵锦超 | zjcnb |
| 16 | 2021/11/29 | 陈出新 | tuichenchuxin |
| 17 | 2021/12/6 | 王波 | wbtlb |
| 18 | 2021/12/13 | 武建东 | wujiandong |
| 19 | 2021/12/20 | 侯阳 | soulasuna |
| 20 | 2021/12/27 | 王小满 | wgy8283335 |
以下行为准则以完全遵循 Apache软件基金会行为准则为前提。
./mvnw -T 1C clean install 可以编译和测试通过。https://github.com/apache/shardingsphere/blob/master/src/resources/checkstyle.xml,请使用checkstyle 8.8 运行规则。result命名;循环中使用each命名循环变量;map 中使用entry代替each。ex;捕获异常且不做任何事情,异常名称命名为ignored。Spinal Case命名(一种使用-分割单词的特殊Snake Case)。equals和==条件表达式中,常量在左,变量在右;大于小于等条件表达式中,变量在左,常量在右。this修饰符。final。null。LinkedList,只有在需要通过下标获取集合中元素值时再使用ArrayList。ArrayList,HashMap等可能产生扩容的集合类型必须指定集合初始大小,避免扩容。嵌套使用
System.out,log等,必须使用断言进行验证。Assert,hamcrest CoreMatchers,Mockito相关可以使用static import。assertTrue,assertFalse,assertNull和assertNotNull。assertThat。not,containsString断言。@Test标注的方法无需 javadoc。200个字符,保证每一行语义完整以便于理解。下划线间隔。DataType和Symbol的规则命名以下划线结尾。与ANTLR内置变量或关键字重名的规则在结尾加下划线以示区分。fragment,fragment定义的规则需在其服务的规则之后声明。Keyword.g4,每个数据库可以有自己特有的规则定义。例如:MySQLKeyword.g4。冒号后空一格再开始写规则,分号在单独一行并保持和上一行相同缩进。5个,则每个分支一行。数据库名称 + 语句类型名称 + Statement。例如:MySQLDQLStatement.g4。如果您想帮助贡献 ShardingSphere 文档或网站,我们很乐意为您提供帮助!任何人都可以贡献,无论您是刚接触项目还是已经使用 ShardingSphere 很长时间,无论是自我认同的开发人员、最终用户,还是那些无法忍受错别字的人,都可以对文档或者网站进行贡献。
在贡献者指南里,已经提到如何提交 Issues 与 Pull Request,这里我们将要介绍如何给官方文档提交 Pull Request。
Fork ShardingSphere 的 master 分支。
shardingsphere
├─docs
  ├─community
  │  ├─archetypes
  │  ├─content
  │  │  ├─contribute
  │  │  ├─powered-by
  │  │  ├─security
  │  │  └─team
  │  ├─layouts
  │  ├─static
  │  └─themes
  ├─document
  │  ├─archetypes
  │  ├─content
  │  │  ├─concepts
  │  │  │  ├─adaptor
  │  │  │  ├─distsql
  │  │  │  ├─mode
  │  │  │  └─pluggable
  │  │  ├─dev-manual
  │  │  ├─downloads
  │  │  ├─features
  │  │  │  ├─encrypt
  │  │  │  ├─governance
  │  │  │  ├─readwrite-splitting
  │  │  │  ├─scaling
  │  │  │  ├─shadow
  │  │  │  ├─sharding
  │  │  │  │  ├─concept
  │  │  │  │  ├─principle
  │  │  │  │  └─use-norms
  │  │  │  ├─test-engine
  │  │  │  └─transaction
  │  │  │      ├─concept
  │  │  │      ├─principle
  │  │  │      └─use-norms
  │  │  ├─others
  │  │  │  ├─api-change-history
  │  │  │  └─faq
  │  │  ├─overview
  │  │  ├─quick-start
  │  │  ├─user-manual
  │  │  │  ├─shardingsphere-jdbc
  │  │  │  │  ├─configuration
  │  │  │  │  └─usage
  │  │  │  ├─shardingsphere-proxy
  │  │  │  ├─shardingsphere-sidecar
  │  │  │  └─shardingsphere-scaling
  │  ├─i18n
  │  ├─layouts
  │  ├─static
  │  └─themes
ShardingSphere 文档使用 Markdown 编写,并使用 Hugo 进行处理生成 html,部署于 asf-site 分支,源代码位于 Github 。
您可以从 Github 网站上提交问题,编辑内容和查看其他人的更改。
页面模板位于 themes 中的 layouts/partials/ 目录中。
任何拥有 Github 帐户的人都可以针对 ShardingSphere 文档提出问题(错误报告)。如果您发现错误,即使您不知道如何修复它,也应提出问题。
如何提出问题?
附加出现问题的文档链接。
详细描述问题。
描述问题对用户造成的困扰。
提出建议修复的方式。
在 Issues 中New issue 提出您的问题。
操作步骤如下:
非特别说明,请使用 Hugo 的0.70.0版本
asf-site 分支由官方定期更新,您无需向 asf-site 提交 pull request
1. 确认 Release Note
Release Note 需提供中文/英文两种版本,确认中文描述是否明确,英文翻译是否准确,并按以下标签进行分类:
2. 确认 Issue 列表
打开 Github Issues ,过滤 Milestone 为 ${RELEASE.VERSION} 且状态为打开的 Issue:
3. 确认 Pull request 列表
打开 Github Pull requests ,过滤 Milestone 为 ${RELEASE.VERSION} 且状态为打开的 Pull request:
4. 关闭 Milestone
${RELEASE.VERSION} 的 Milestone 完成状态为 100%Close 关闭 Milestone5. 发送讨论邮件
dev@shardingsphere.apache.org,在邮件正文中描述或链接 Release Note1. 安装 GPG
在GnuPG官网下载安装包。
GnuPG 的 1.x 版本和 2.x 版本的命令有细微差别,下列说明以GnuPG-2.1.23版本为例。
安装完成后,执行以下命令查看版本号。
gpg --version
2. 创建 key
安装完成后,执行以下命令创建 key。
GnuPG-2.x可使用:
gpg --full-gen-key
GnuPG-1.x可使用:
gpg --gen-key
根据提示完成 key:
注意:请使用 Apache mail 生成 GPG 的 Key。
gpg (GnuPG) 2.0.12; Copyright (C) 2009 Free Software Foundation, Inc.
This is free software: you are free to change and redistribute it.
There is NO WARRANTY, to the extent permitted by law.

Please select what kind of key you want:
  (1) RSA and RSA (default)
  (2) DSA and Elgamal
  (3) DSA (sign only)
  (4) RSA (sign only)
Your selection? 1
RSA keys may be between 1024 and 4096 bits long.
What keysize do you want? (2048) 4096
Requested keysize is 4096 bits
Please specify how long the key should be valid.
        0 = key does not expire
     <n>  = key expires in n days
     <n>w = key expires in n weeks
     <n>m = key expires in n months
     <n>y = key expires in n years
Key is valid for? (0)
Key does not expire at all
Is this correct? (y/N) y

GnuPG needs to construct a user ID to identify your key.

Real name: ${输入用户名}
Email address: ${输入邮件地址}
Comment: ${输入注释}
You selected this USER-ID:
   "${输入的用户名} (${输入的注释}) <${输入的邮件地址}>"

Change (N)ame, (C)omment, (E)mail or (O)kay/(Q)uit? O
You need a Passphrase to protect your secret key. # 输入密码
3. 查看生成的 key
gpg --list-keys
执行结果:
pub   4096R/700E6065 2019-03-20
uid                  ${用户名} (${注释}) <{邮件地址}>
sub   4096R/0B7EF5B2 2019-03-20
其中 700E6065 为公钥 ID。
4. 将公钥同步到服务器
命令如下:
gpg --keyserver hkp://pool.sks-keyservers.net --send-key 700E6065
pool.sks-keyservers.net为随意挑选的公钥服务器,每个服务器之间是自动同步的,选任意一个即可。
**1. 设置 settings.xml文件 **
将以下模板添加到 ~/.m2/settings.xml中,所有密码需要加密后再填入。
加密设置可参考这里。
<settings>
  <servers>
    <server>
      <id>apache.snapshots.https</id>
      <username> <!-- APACHE LDAP 用户名 --> </username>
      <password> <!-- APACHE LDAP 加密后的密码 --> </password>
    </server>
    <server>
      <id>apache.releases.https</id>
      <username> <!-- APACHE LDAP 用户名 --> </username>
      <password> <!-- APACHE LDAP 加密后的密码 --> </password>
    </server>
  </servers>
</settings>
2. 创建发布分支
假设从 github 下载的 ShardingSphere 源代码在~/shardingsphere/目录;假设即将发布的版本为${RELEASE.VERSION}。
创建${RELEASE.VERSION}-release分支,接下来的操作都在该分支进行。
## ${name}为源码所在分支,如:master,dev-4.x
git clone --branch ${name} https://github.com/apache/shardingsphere.git ~/shardingsphere
cd ~/shardingsphere/
git pull
git checkout -b ${RELEASE.VERSION}-release
git push origin ${RELEASE.VERSION}-release
3. 更新版本说明和示例版本
在发布分支上更新如下文件,并提交 PR 到发布分支:
https://github.com/apache/shardingsphere/blob/${RELEASE.VERSION}-release/RELEASE-NOTES.md
更新examples模块的 pom,将版本由${CURRENT.VERSION} 替换为${RELEASE.VERSION},并提交 PR 到发布分支。
4. 发布预校验
mvn release:prepare -Prelease -Darguments="-DskipTests" -DautoVersionSubmodules=true -DdryRun=true -Dusername=${Github用户名}
-Prelease: 选择 release 的 profile,这个 profile 会打包所有源码、jar 文件以及 ShardingSphere-Proxy 的可执行二进制包。
-DautoVersionSubmodules=true:作用是发布过程中版本号只需要输入一次,不必为每个子模块都输入一次。
-DdryRun=true:演练,即不产生版本号提交,不生成新的 tag。
5. 准备发布
首先清理发布预校验本地信息。
mvn release:clean
mvn release:prepare -Prelease -Darguments="-DskipTests" -DautoVersionSubmodules=true -DpushChanges=false -Dusername=${Github 用户名}
和上一步演练的命令基本相同,去掉了-DdryRun=true 参数。
-DpushChanges=false:不要将修改后的版本号和 tag 自动提交至 Github。
将本地文件检查无误后,提交至 github。
git push origin ${RELEASE.VERSION}-release
git push origin --tags
6. 部署发布
mvn release:perform -Prelease -Darguments="-DskipTests" -DautoVersionSubmodules=true -Dusername=${Github 用户名}
执行完该命令后,待发布版本会自动上传到 Apache 的临时筹备仓库(staging repository)。
访问https://repository.apache.org/#stagingRepositories, 使用 Apache 的 LDAP 账户登录后,就会看到上传的版本,Repository列的内容即为 ${STAGING.REPOSITORY}。
点击Close来告诉 Nexus 这个构建已经完成,只有这样该版本才是可用的。
如果电子签名等出现问题,Close会失败,可以通过Activity查看失败信息。
1. 检出 shardingsphere 发布目录
如无本地工作目录,则先创建本地工作目录。
mkdir -p ~/ss_svn/dev/
cd ~/ss_svn/dev/
创建完毕后,从 Apache SVN 检出 shardingsphere 发布目录。
svn --username=${APACHE LDAP 用户名} co https://dist.apache.org/repos/dist/dev/shardingsphere
cd ~/ss_svn/dev/shardingsphere
2. 添加 gpg 公钥
仅第一次部署的账号需要添加,只要KEYS中包含已经部署过的账户的公钥即可。
gpg -a --export ${GPG用户名} >> KEYS
3. 将待发布的内容添加至 SVN 目录
创建版本号目录。
mkdir -p ~/ss_svn/dev/shardingsphere/${RELEASE.VERSION}
cd ~/ss_svn/dev/shardingsphere/${RELEASE.VERSION}
将源码包、二进制包和 ShardingSphere-Proxy 可执行二进制包添加至 SVN 工作目录。
cp -f ~/shardingsphere/shardingsphere-distribution/shardingsphere-src-distribution/target/*.zip* ~/ss_svn/dev/shardingsphere/${RELEASE.VERSION}
cp -f ~/shardingsphere/shardingsphere-distribution/shardingsphere-jdbc-distribution/target/*.tar.gz* ~/ss_svn/dev/shardingsphere/${RELEASE.VERSION}
cp -f ~/shardingsphere/shardingsphere-distribution/shardingsphere-proxy-distribution/target/*.tar.gz* ~/ss_svn/dev/shardingsphere/${RELEASE.VERSION}
4. 提交 Apache SVN
svn add *
svn --username=${APACHE LDAP 用户名} commit -m "release ${RELEASE.VERSION}"
检查 sha512 哈希
shasum -c apache-shardingsphere-${RELEASE.VERSION}-*.sha512
检查 gpg 签名
首先导入发布人公钥。从 svn 仓库导入 KEYS 到本地环境。(发布版本的人不需要再导入,帮助做验证的人需要导入,用户名填发版人的即可)
curl https://dist.apache.org/repos/dist/dev/shardingsphere/KEYS >> KEYS
gpg --import KEYS
gpg --edit-key "${发布人的 gpg 用户名}"
  > trust

Please decide how far you trust this user to correctly verify other users' keys
(by looking at passports, checking fingerprints from different sources, etc.)

  1 = I don't know or won't say
  2 = I do NOT trust
  3 = I trust marginally
  4 = I trust fully
  5 = I trust ultimately
  m = back to the main menu

Your decision? 5

  > save
然后进行 gpg 签名检查。
gpg --verify apache-shardingsphere-${RELEASE.VERSION}-src.zip.asc apache-shardingsphere-${RELEASE.VERSION}-src.zip
gpg --verify apache-shardingsphere-${RELEASE.VERSION}-shardingsphere-jdbc-bin.tar.gz.asc apache-shardingsphere-${RELEASE.VERSION}-shardingsphere-jdbc-bin.tar.gz
gpg --verify apache-shardingsphere-${RELEASE.VERSION}-shardingsphere-proxy-bin.tar.gz.asc apache-shardingsphere-${RELEASE.VERSION}-shardingsphere-proxy-bin.tar.gz
检查发布文件内容
对比源码包与 Github 上 tag 的内容差异
curl -Lo tag-${RELEASE.VERSION}.zip https://github.com/apache/shardingsphere/archive/${RELEASE.VERSION}.zip
unzip tag-${RELEASE.VERSION}.zip
unzip apache-shardingsphere-${RELEASE.VERSION}-src.zip
diff -r apache-shardingsphere-${RELEASE.VERSION}-src-release shardingsphere-${RELEASE.VERSION}
检查源码包的文件内容
LICENSE和NOTICE文件NOTICE文件中的年份正确检查二进制包的文件内容
解压缩
apache-shardingsphere-${RELEASE.VERSION}-shardingsphere-jdbc-bin.tar.gz,
apache-shardingsphere-${RELEASE.VERSION}-shardingsphere-proxy-bin.tar.gz
进行如下检查:
LICENSE和NOTICE文件NOTICE文件中的年份正确LICENSE文件中声名license目录NOTICE文件,那么这些NOTICE文件也需要加入到版本的NOTICE文件中投票阶段
ShardingSphere 社区投票,发起投票邮件到dev@shardingsphere.apache.org。PMC 需要先按照文档检查版本的正确性,然后再进行投票。
经过至少 72 小时并统计到 3 个+1 PMC member票后,即可进入下一阶段的投票。
宣布投票结果,发起投票结果邮件到dev@shardingsphere.apache.org。
投票模板
标题:
[VOTE] Release Apache ShardingSphere ${RELEASE.VERSION}
正文:
Hello ShardingSphere Community,

This is a call for vote to release Apache ShardingSphere version ${RELEASE.VERSION}

Release notes:
https://github.com/apache/shardingsphere/blob/master/RELEASE-NOTES.md

The release candidates:
https://dist.apache.org/repos/dist/dev/shardingsphere/${RELEASE.VERSION}/

Maven 2 staging repository:
https://repository.apache.org/content/repositories/${STAGING.REPOSITORY}/org/apache/shardingsphere/

Git tag for the release:
https://github.com/apache/shardingsphere/tree/${RELEASE.VERSION}/

Release Commit ID:
https://github.com/apache/shardingsphere/commit/xxxxxxxxxxxxxxxxxxxxxxx

Keys to verify the Release Candidate:
https://dist.apache.org/repos/dist/dev/shardingsphere/KEYS

Look at here for how to verify this release candidate:
https://shardingsphere.apache.org/community/en/contribute/release/

GPG user ID:
${YOUR.GPG.USER.ID}

The vote will be open for at least 72 hours or until necessary number of votes are reached.

Please vote accordingly:

[ ] +1 approve

[ ] +0 no opinion

[ ] -1 disapprove with the reason

PMC vote is +1 binding, all others is +1 non-binding.

Checklist for reference:

[ ] Download links are valid.

[ ] Checksums and PGP signatures are valid.

[ ] Source code distributions have correct names matching the current release.

[ ] LICENSE and NOTICE files are correct for each ShardingSphere repo.

[ ] All files have license headers if necessary.

[ ] No compiled archives bundled in source archive.
标题:
[RESULT][VOTE] Release Apache ShardingSphere ${RELEASE.VERSION}
正文:
We’ve received 3 +1 binding votes and one +1 non-binding vote:

+1 binding, xxx
+1 binding, xxx
+1 binding, xxx

+1 non-binding, xxx

Thank you everyone for taking the time to review the release and help us.
I will process to publish the release and send ANNOUNCE.
1. 将源码、二进制包以及 KEYS 从 svn 的 dev 目录移动到 release 目录
svn mv https://dist.apache.org/repos/dist/dev/shardingsphere/${RELEASE.VERSION} https://dist.apache.org/repos/dist/release/shardingsphere/ -m "transfer packages for ${RELEASE.VERSION}"
svn delete https://dist.apache.org/repos/dist/release/shardingsphere/KEYS -m "delete KEYS"
svn cp https://dist.apache.org/repos/dist/dev/shardingsphere/KEYS https://dist.apache.org/repos/dist/release/shardingsphere/ -m "transfer KEYS for ${RELEASE.VERSION}"
2. 在 Apache Staging 仓库找到 ShardingSphere 并点击Release
3. 合并 Github 的 release 分支到master, 合并完成后删除 release 分支
git checkout master
git merge origin/${RELEASE.VERSION}-release
git pull
git push origin master
git push --delete origin ${RELEASE.VERSION}-release
git branch -d ${RELEASE.VERSION}-release
4. 修改 README 文件
将README.md和README_ZH.md里的${PREVIOUS.RELEASE.VERSION}修改为${RELEASE.VERSION}
5. 发布 Docker
5.1 准备工作
本地安装 Docker,并启动服务。
5.2 编译 Docker 镜像
git checkout ${RELEASE.VERSION}
cd ~/shardingsphere/shardingsphere-distribution/shardingsphere-proxy-distribution/
mvn clean package -Prelease,docker
5.3 给本地 Docker 镜像打标记
通过docker images查看到 IMAGE ID,例如为:e9ea51023687
docker tag e9ea51023687 apache/shardingsphere-proxy:latest
docker tag e9ea51023687 apache/shardingsphere-proxy:${RELEASE.VERSION}
5.4 发布 Docker 镜像
docker login
docker push apache/shardingsphere-proxy:latest
docker push apache/shardingsphere-proxy:${RELEASE_VERSION}
5.5 确认发布成功
登录 Docker Hub 查看是否有发布的镜像
6. GitHub版本发布
在 GitHub Releases 页面的 ${RELEASE_VERSION} 版本上点击 Edit
编辑版本号及版本说明,并点击 Publish release
7. 更新下载页面
等待并确认新的发布版本同步至 Apache 镜像后,更新如下页面:
https://shardingsphere.apache.org/document/current/en/downloads/
https://shardingsphere.apache.org/document/current/cn/downloads/
GPG签名文件和哈希校验文件的下载连接应该使用这个前缀:https://downloads.apache.org/shardingsphere/
最新版本中保留一个最新的版本。Incubator阶段历史版本会自动归档到Archive repository
8. 邮件通知版本发布完成
发送邮件到dev@shardingsphere.apache.org和announce@apache.org通知完成版本发布
通知邮件模板(使用纯文本模式):
标题:
[ANNOUNCE] Apache ShardingSphere ${RELEASE.VERSION} available
正文:
Hi all,

Apache ShardingSphere Team is glad to announce the new release of Apache ShardingSphere ${RELEASE.VERSION}.

Apache ShardingSphere is an open-source ecosystem consisted of a set of distributed database solutions, including 3 independent products, JDBC, Proxy & Sidecar (Planning).
They all provide functions of data scale out, distributed transaction and distributed governance, applicable in a variety of situations such as Java isomorphism, heterogeneous language and cloud native.
Apache ShardingSphere aiming at reasonably making full use of the computation and storage capacity of existed database in distributed system, rather than a totally new database.
As the cornerstone of enterprises, relational database still takes a huge market share. Therefore, we prefer to focus on its increment instead of a total overturn.

Download Links: https://shardingsphere.apache.org/document/current/en/downloads/

Release Notes: https://github.com/apache/shardingsphere/blob/master/RELEASE-NOTES.md

Website: https://shardingsphere.apache.org/

ShardingSphere Resources:
- Issue: https://github.com/apache/shardingsphere/issues/
- Mailing list: dev@shardingsphere.apache.org
- Documents: https://shardingsphere.apache.org/document/current/


- Apache ShardingSphere Team
详情请参见发布指南。
1. 设置settings.xml文件
将以下模板添加到 ~/.m2/settings.xml中,所有密码需要加密后再填入。
加密设置可参考这里。
<settings>
  <servers>
    <server>
      <id>apache.snapshots.https</id>
      <username> <!-- APACHE LDAP 用户名 --> </username>
      <password> <!-- APACHE LDAP 加密后的密码 --> </password>
    </server>
    <server>
      <id>apache.releases.https</id>
      <username> <!-- APACHE LDAP 用户名 --> </username>
      <password> <!-- APACHE LDAP 加密后的密码 --> </password>
    </server>
  </servers>
</settings>
2. 更新版本说明和示例版本
在Github主干上更新如下文件,并提交PR到主干:
https://github.com/apache/shardingsphere-elasticjob/blob/master/RELEASE-NOTES.md
更新examples模块的pom,将版本由${CURRENT.VERSION}替换为${RELEASE.VERSION}。
3. 创建发布分支
假设从github下载的ElasticJob源代码在~/elasticjob/目录;假设即将发布的版本为${RELEASE.VERSION}。
创建${RELEASE.VERSION}-release分支,接下来的操作都在该分支进行。
## ${name}为源码所在分支,如:master,dev-4.x
git clone --branch ${name} https://github.com/apache/shardingsphere-elasticjob.git ~/elasticjob
cd ~/elasticjob/
git pull
git checkout -b ${RELEASE.VERSION}-release
git push origin ${RELEASE.VERSION}-release
4. 发布预校验
mvn release:prepare -Prelease -Darguments="-DskipTests" -DautoVersionSubmodules=true -DdryRun=true -Dusername=${Github用户名}
-Prelease: 选择release的profile,这个profile会打包所有源码和jar文件。
-DautoVersionSubmodules=true:作用是发布过程中版本号只需要输入一次,不必为每个子模块都输入一次。
-DdryRun=true:演练,即不产生版本号提交,不生成新的tag。
5. 准备发布
首先清理发布预校验本地信息。
mvn release:clean
mvn release:prepare -Prelease -Darguments="-DskipTests" -DautoVersionSubmodules=true -DpushChanges=false -Dusername=${Github用户名}
和上一步演练的命令基本相同,去掉了-DdryRun=true参数。
-DpushChanges=false:不要将修改后的版本号和tag自动提交至Github。
将本地文件检查无误后,提交至github。
git push origin ${RELEASE.VERSION}-release
git push origin --tags
6. 部署发布
mvn release:perform -Prelease -Darguments="-DskipTests" -DautoVersionSubmodules=true -Dusername=${Github用户名}
执行完该命令后,待发布版本会自动上传到Apache的临时筹备仓库(staging repository)。
访问https://repository.apache.org/#stagingRepositories, 使用Apache的LDAP账户登录后,就会看到上传的版本,Repository列的内容即为${STAGING.REPOSITORY}。
点击Close来告诉Nexus这个构建已经完成,只有这样该版本才是可用的。
如果电子签名等出现问题,Close会失败,可以通过Activity查看失败信息。
1. 检出shardingsphere发布目录
如无本地工作目录,则先创建本地工作目录。
mkdir -p ~/ss_svn/dev/
cd ~/ss_svn/dev/
创建完毕后,从Apache SVN检出shardingsphere发布目录。
svn --username=${APACHE LDAP 用户名} co https://dist.apache.org/repos/dist/dev/shardingsphere
cd ~/ss_svn/dev/shardingsphere
2. 添加gpg公钥
仅第一次部署的账号需要添加,只要KEYS中包含已经部署过的账户的公钥即可。
gpg -a --export ${GPG用户名} >> KEYS
3. 将待发布的内容添加至SVN目录
创建版本号目录。
mkdir -p ~/ss_svn/dev/shardingsphere/elasticjob-${RELEASE.VERSION}
cd ~/ss_svn/dev/shardingsphere/elasticjob-${RELEASE.VERSION}
将源码包和二进制包添加至SVN工作目录。
cp -f ~/elasticjob/elasticjob-distribution/elasticjob-src-distribution/target/*.zip* ~/ss_svn/dev/shardingsphere/elasticjob-${RELEASE.VERSION}
cp -f ~/elasticjob/elasticjob-distribution/elasticjob-lite-distribution/target/*.tar.gz* ~/ss_svn/dev/shardingsphere/elasticjob-${RELEASE.VERSION}
cp -f ~/elasticjob/elasticjob-distribution/elasticjob-cloud-executor-distribution/target/*.tar.gz* ~/ss_svn/dev/shardingsphere/elasticjob-${RELEASE.VERSION}
cp -f ~/elasticjob/elasticjob-distribution/elasticjob-cloud-scheduler-distribution/target/*.tar.gz* ~/ss_svn/dev/shardingsphere/elasticjob-${RELEASE.VERSION}
4. 提交Apache SVN
svn add *
svn --username=${APACHE LDAP 用户名} commit -m "release elasticjob-${RELEASE.VERSION}"
检查sha512哈希
shasum -c apache-shardingsphere-elasticjob-${RELEASE.VERSION}-*.sha512
检查gpg签名
首先导入发布人公钥。从svn仓库导入KEYS到本地环境。(发布版本的人不需要再导入,帮助做验证的人需要导入,用户名填发版人的即可)
curl https://dist.apache.org/repos/dist/dev/shardingsphere/KEYS >> KEYS
gpg --import KEYS
gpg --edit-key "${发布人的gpg用户名}"
  > trust

Please decide how far you trust this user to correctly verify other users' keys
(by looking at passports, checking fingerprints from different sources, etc.)

  1 = I don't know or won't say
  2 = I do NOT trust
  3 = I trust marginally
  4 = I trust fully
  5 = I trust ultimately
  m = back to the main menu

Your decision? 5

  > save
然后进行gpg签名检查。
gpg --verify apache-shardingsphere-elasticjob-${RELEASE.VERSION}-src.zip.asc apache-shardingsphere-elasticjob-${RELEASE.VERSION}-src.zip
gpg --verify apache-shardingsphere-elasticjob-${RELEASE.VERSION}-lite-bin.tar.gz.asc apache-shardingsphere-elasticjob-${RELEASE.VERSION}-lite-bin.tar.gz
gpg --verify apache-shardingsphere-elasticjob-${RELEASE.VERSION}-cloud-executor-bin.tar.gz.asc apache-shardingsphere-elasticjob-${RELEASE.VERSION}-cloud-executor-bin.tar.gz
gpg --verify apache-shardingsphere-elasticjob-${RELEASE.VERSION}-cloud-scheduler-bin.tar.gz.asc apache-shardingsphere-elasticjob-${RELEASE.VERSION}-cloud-scheduler-bin.tar.gz
检查发布文件内容
对比源码包与Github上tag的内容差异
curl -Lo tag-${RELEASE.VERSION}.zip https://github.com/apache/shardingsphere-elasticjob/archive/${RELEASE.VERSION}.zip
unzip tag-${RELEASE.VERSION}.zip
unzip apache-shardingsphere-elasticjob-${RELEASE.VERSION}-src.zip
diff -r apache-shardingsphere-elasticjob-${RELEASE.VERSION}-src-release shardingsphere-elasticjob-${RELEASE.VERSION}
检查源码包的文件内容
LICENSE和NOTICE文件NOTICE文件中的年份正确检查二进制包的文件内容
解压缩
apache-shardingsphere-elasticjob-${RELEASE.VERSION}-lite-bin.tar.gz,
apache-shardingsphere-elasticjob-${RELEASE.VERSION}-cloud-executor-bin.tar.gz和
apache-shardingsphere-elasticjob-${RELEASE.VERSION}-cloud-scheduler-bin.tar.gz
进行如下检查:
LICENSE和NOTICE文件NOTICE文件中的年份正确LICENSE文件中声名license目录NOTICE文件,那么这些NOTICE文件也需要加入到版本的NOTICE文件中投票阶段
ShardingSphere社区投票,发起投票邮件到dev@shardingsphere.apache.org。PMC需要先按照文档检查版本的正确性,然后再进行投票。
经过至少72小时并统计到3个+1 PMC member票后,即可进入下一阶段的投票。
宣布投票结果,发起投票结果邮件到dev@shardingsphere.apache.org。
投票模板
标题:
[VOTE] Release Apache ShardingSphere ElasticJob-${RELEASE.VERSION}
正文:
Hello ShardingSphere Community,

This is a call for vote to release Apache ShardingSphere ElasticJob-${RELEASE.VERSION}

Release notes:
https://github.com/apache/shardingsphere-elasticjob/blob/master/RELEASE-NOTES.md

The release candidates:
https://dist.apache.org/repos/dist/dev/shardingsphere/elasticjob-${RELEASE.VERSION}/

Maven 2 staging repository:
https://repository.apache.org/content/repositories/${STAGING.REPOSITORY}/org/apache/shardingsphere/

Git tag for the release:
https://github.com/apache/shardingsphere-elasticjob/tree/${RELEASE.VERSION}/

Release Commit ID:
https://github.com/apache/shardingsphere-elasticjob/commit/xxxxxxxxxxxxxxxxxxxxxxx

Keys to verify the Release Candidate:
https://dist.apache.org/repos/dist/dev/shardingsphere/KEYS

Look at here for how to verify this release candidate:
https://shardingsphere.apache.org/community/en/contribute/release-elasticjob/

GPG user ID:
${YOUR.GPG.USER.ID}

The vote will be open for at least 72 hours or until necessary number of votes are reached.

Please vote accordingly:

[ ] +1 approve

[ ] +0 no opinion

[ ] -1 disapprove with the reason

PMC vote is +1 binding, all others is +1 non-binding.

Checklist for reference:

[ ] Download links are valid.

[ ] Checksums and PGP signatures are valid.

[ ] Source code distributions have correct names matching the current release.

[ ] LICENSE and NOTICE files are correct for each ShardingSphere repo.

[ ] All files have license headers if necessary.

[ ] No compiled archives bundled in source archive.
标题:
[RESULT][VOTE] Release Apache ShardingSphere ElasticJob-${RELEASE.VERSION}
正文:
We’ve received 3 +1 binding votes and one +1 non-binding vote:

+1 binding, xxx
+1 binding, xxx
+1 binding, xxx

+1 non-binding, xxx

Thank you everyone for taking the time to review the release and help us.
I will process to publish the release and send ANNOUNCE.
1. 将源码、二进制包以及KEYS从svn的dev目录移动到release目录
svn mv https://dist.apache.org/repos/dist/dev/shardingsphere/elasticjob-${RELEASE.VERSION} https://dist.apache.org/repos/dist/release/shardingsphere/ -m "transfer packages for elasticjob-${RELEASE.VERSION}"
svn delete https://dist.apache.org/repos/dist/release/shardingsphere/KEYS -m "delete KEYS"
svn cp https://dist.apache.org/repos/dist/dev/shardingsphere/KEYS https://dist.apache.org/repos/dist/release/shardingsphere/ -m "transfer KEYS for elasticjob-${RELEASE.VERSION}"
2. 在Apache Staging仓库找到ShardingSphere并点击Release
3. 合并Github的release分支到master, 合并完成后删除release分支
git checkout master
git merge origin/${RELEASE.VERSION}-release
git pull
git push origin master
git push --delete origin ${RELEASE.VERSION}-release
git branch -d ${RELEASE.VERSION}-release
4. 发布 Docker
4.1 准备工作
本地安装 Docker,并启动服务。
4.2 编译 Docker 镜像
git checkout ${RELEASE.VERSION}
cd ~/elasticjob/elasticjob-distribution/elasticjob-cloud-scheduler-distribution/
mvn clean package -Prelease,docker
4.3 给本地 Docker 镜像打标记
通过docker images查看到IMAGE ID,例如为:e9ea51023687
docker tag e9ea51023687 apache/shardingsphere-elasticjob-cloud-scheduler:latest
docker tag e9ea51023687 apache/shardingsphere-elasticjob-cloud-scheduler:${RELEASE.VERSION}
4.4 发布 Docker 镜像
docker login
docker push apache/shardingsphere-elasticjob-cloud-scheduler:latest
docker push apache/shardingsphere-elasticjob-cloud-scheduler:${RELEASE_VERSION}
4.5 确认发布成功
登录 Docker Hub 查看是否有发布的镜像
5. GitHub版本发布
在 GitHub Releases 页面的 ${RELEASE_VERSION} 版本上点击 Edit
编辑版本号及版本说明,并点击Publish release
6. 更新下载页面
等待并确认新的发布版本同步至 Apache 镜像后,更新如下页面:
https://shardingsphere.apache.org/elasticjob/current/en/downloads/
https://shardingsphere.apache.org/elasticjob/current/cn/downloads/
GPG签名文件和哈希校验文件的下载连接应该使用这个前缀:https://downloads.apache.org/shardingsphere/
最新版本中保留一个最新的版本。
7. 邮件通知版本发布完成
发送邮件到dev@shardingsphere.apache.org和announce@apache.org通知完成版本发布
通知邮件模板:
标题:
[ANNOUNCE] Apache ShardingSphere ElasticJob-${RELEASE.VERSION} available
正文:
Hi all,

Apache ShardingSphere Team is glad to announce the new release of Apache ShardingSphere ElasticJob-${RELEASE.VERSION}.

ElasticJob is a distributed scheduling solution consisting of two separate projects, ElasticJob-Lite and ElasticJob-Cloud.
Through the functions of flexible scheduling, resource management and job management, it creates a distributed scheduling solution suitable for Internet scenarios, and provides diversified job ecosystem through open architecture design. It uses a unified job API for each project. Developers only need code one time and can deploy at will.
ElasticJob became an Apache ShardingSphere Sub project on May 28 2020.

Download Links: https://shardingsphere.apache.org/elasticjob/current/en/downloads/

Release Notes: https://github.com/apache/shardingsphere-elasticjob/blob/master/RELEASE-NOTES.md

Website: http://shardingsphere.apache.org/elasticjob/

ShardingSphere-ElasticJob Resources:
- Issue: https://github.com/apache/shardingsphere-elasticjob/issues/
- Mailing list: dev@shardingsphere.apache.org
- Documents: https://shardingsphere.apache.org/elasticjob/current/en/overview/


- Apache ShardingSphere Team
详情请参见发布指南。
1. 设置settings.xml文件
将以下模板添加到 ~/.m2/settings.xml中,所有密码需要加密后再填入。
加密设置可参考这里。
<settings>
  <servers>
    <server>
      <id>apache.snapshots.https</id>
      <username> <!-- APACHE LDAP 用户名 --> </username>
      <password> <!-- APACHE LDAP 加密后的密码 --> </password>
    </server>
    <server>
      <id>apache.releases.https</id>
      <username> <!-- APACHE LDAP 用户名 --> </username>
      <password> <!-- APACHE LDAP 加密后的密码 --> </password>
    </server>
  </servers>
</settings>
2. 更新版本说明
https://github.com/apache/shardingsphere-elasticjob-ui/blob/master/RELEASE-NOTES.md
3. 创建发布分支
假设从github下载的ElasticJob-UI源代码在~/elasticjob-ui/目录;假设即将发布的版本为${RELEASE.VERSION}。
创建${RELEASE.VERSION}-release分支,接下来的操作都在该分支进行。
## ${name}为源码所在分支,如:master,dev-4.x
git clone --branch ${name} https://github.com/apache/shardingsphere-elasticjob-ui.git ~/elasticjob-ui
cd ~/elasticjob-ui/
git pull
git checkout -b ${RELEASE.VERSION}-release
git push origin ${RELEASE.VERSION}-release
4. 发布预校验
cd ~/elasticjob-ui
mvn release:prepare -Prelease -Darguments="-DskipTests" -DautoVersionSubmodules=true -DdryRun=true -Dusername=${Github用户名}
-Prelease: 选择release的profile,这个profile会打包所有源码、jar文件以及ElasticJob-UI的可执行二进制包。
-DautoVersionSubmodules=true:作用是发布过程中版本号只需要输入一次,不必为每个子模块都输入一次。
-DdryRun=true:演练,即不产生版本号提交,不生成新的tag。
5. 准备发布
首先清理发布预校验本地信息。
cd ~/elasticjob-ui
mvn release:clean
然后准备执行发布。
cd ~/elasticjob-ui
mvn release:prepare -Prelease -Darguments="-DskipTests" -DautoVersionSubmodules=true -DpushChanges=false -Dusername=${Github用户名}
和上一步演练的命令基本相同,去掉了-DdryRun=true参数。
-DpushChanges=false:不要将修改后的版本号和tag自动提交至Github。
将本地文件检查无误后,提交至github。
git push origin ${RELEASE.VERSION}-release
git push origin --tags
6. 部署发布
cd ~/elasticjob-ui
mvn release:perform -Prelease -Darguments="-DskipTests" -DautoVersionSubmodules=true -Dusername=${Github用户名}
1. 检出shardingsphere发布目录
如无本地工作目录,则先创建本地工作目录。
mkdir -p ~/ss_svn/dev/
cd ~/ss_svn/dev/
创建完毕后,从Apache SVN检出shardingsphere发布目录。
svn --username=${APACHE LDAP 用户名} co https://dist.apache.org/repos/dist/dev/shardingsphere
cd ~/ss_svn/dev/shardingsphere
2. 添加gpg公钥
仅第一次部署的账号需要添加,只要KEYS中包含已经部署过的账户的公钥即可。
gpg -a --export ${GPG用户名} >> KEYS
3. 将待发布的内容添加至SVN目录
创建版本号目录。
mkdir -p ~/ss_svn/dev/shardingsphere/elasticjob-ui-${RELEASE.VERSION}
cd ~/ss_svn/dev/shardingsphere/elasticjob-ui-${RELEASE.VERSION}
将源码包和二进制包添加至SVN工作目录。
cp -f ~/elasticjob-ui/shardingsphere-elasticjob-ui-distribution/shardingsphere-elasticjob-ui-src-distribution/target/*.zip ~/ss_svn/dev/shardingsphere/elasticjob-ui-${RELEASE.VERSION}
cp -f ~/elasticjob-ui/shardingsphere-elasticjob-ui-distribution/shardingsphere-elasticjob-ui-src-distribution/target/*.zip.asc ~/ss_svn/dev/shardingsphere/elasticjob-ui-${RELEASE.VERSION}
cp -f ~/elasticjob-ui/shardingsphere-elasticjob-ui-distribution/shardingsphere-elasticjob-lite-ui-bin-distribution/target/*.tar.gz ~/ss_svn/dev/shardingsphere/elasticjob-ui-${RELEASE.VERSION}
cp -f ~/elasticjob-ui/shardingsphere-elasticjob-ui-distribution/shardingsphere-elasticjob-lite-ui-bin-distribution/target/*.tar.gz.asc ~/ss_svn/dev/shardingsphere/elasticjob-ui-${RELEASE.VERSION}
cp -f ~/elasticjob-ui/shardingsphere-elasticjob-ui-distribution/shardingsphere-elasticjob-cloud-ui-bin-distribution/target/*.tar.gz ~/ss_svn/dev/shardingsphere/elasticjob-ui-${RELEASE.VERSION}
cp -f ~/elasticjob-ui/shardingsphere-elasticjob-ui-distribution/shardingsphere-elasticjob-cloud-ui-bin-distribution/target/*.tar.gz.asc ~/ss_svn/dev/shardingsphere/elasticjob-ui-${RELEASE.VERSION}
4. 生成文件签名
shasum -a 512 apache-shardingsphere-elasticjob-${RELEASE.VERSION}-ui-src.zip > apache-shardingsphere-elasticjob-${RELEASE.VERSION}-ui-src.zip.sha512
shasum -b -a 512 apache-shardingsphere-elasticjob-${RELEASE.VERSION}-lite-ui-bin.tar.gz > apache-shardingsphere-elasticjob-${RELEASE.VERSION}-lite-ui-bin.tar.gz.sha512
shasum -b -a 512 apache-shardingsphere-elasticjob-${RELEASE.VERSION}-cloud-ui-bin.tar.gz > apache-shardingsphere-elasticjob-${RELEASE.VERSION}-cloud-ui-bin.tar.gz.sha512
5. 提交Apache SVN
cd ~/ss_svn/dev/shardingsphere/
svn add elasticjob-ui-${RELEASE.VERSION}
svn --username=${APACHE LDAP 用户名} commit -m "release elasticjob-ui-${RELEASE.VERSION}"
检查sha512哈希
shasum -c apache-shardingsphere-elasticjob-${RELEASE.VERSION}-ui-src.zip.sha512
shasum -c apache-shardingsphere-elasticjob-${RELEASE.VERSION}-lite-ui-bin.tar.gz.sha512
shasum -c apache-shardingsphere-elasticjob-${RELEASE.VERSION}-cloud-ui-bin.tar.gz.sha512
检查gpg签名
首先导入发布人公钥。从svn仓库导入KEYS到本地环境。(发布版本的人不需要再导入,帮助做验证的人需要导入,用户名填发版人的即可)
curl https://dist.apache.org/repos/dist/dev/shardingsphere/KEYS >> KEYS
gpg --import KEYS
gpg --edit-key "${发布人的gpg用户名}"
  > trust

Please decide how far you trust this user to correctly verify other users' keys
(by looking at passports, checking fingerprints from different sources, etc.)

  1 = I don't know or won't say
  2 = I do NOT trust
  3 = I trust marginally
  4 = I trust fully
  5 = I trust ultimately
  m = back to the main menu

Your decision? 5

  > save
然后进行gpg签名检查。
gpg --verify apache-shardingsphere-elasticjob-${RELEASE.VERSION}-ui-src.zip.asc apache-shardingsphere-elasticjob-${RELEASE.VERSION}-ui-src.zip
gpg --verify apache-shardingsphere-elasticjob-${RELEASE.VERSION}-lite-ui-bin.tar.gz.asc apache-shardingsphere-elasticjob-${RELEASE.VERSION}-lite-ui-bin.tar.gz
gpg --verify apache-shardingsphere-elasticjob-${RELEASE.VERSION}-cloud-ui-bin.tar.gz.asc apache-shardingsphere-elasticjob-${RELEASE.VERSION}-cloud-ui-bin.tar.gz
检查发布文件内容
对比源码包与Github上tag的内容差异
curl -Lo tag-${RELEASE.VERSION}.zip https://github.com/apache/shardingsphere-elasticjob-ui/archive/${RELEASE.VERSION}.zip
unzip tag-${RELEASE.VERSION}.zip
unzip apache-shardingsphere-elasticjob-${RELEASE.VERSION}-ui-src.zip
diff -r apache-shardingsphere-elasticjob-${RELEASE.VERSION}-ui-src shardingsphere-elasticjob-ui-${RELEASE.VERSION}
检查源码包的文件内容
LICENSE和NOTICE文件NOTICE文件中的年份正确检查二进制包的文件内容
解压缩apache-shardingsphere-elasticjob-${RELEASE.VERSION}-lite-ui-bin.tar.gz和apache-shardingsphere-elasticjob-${RELEASE.VERSION}-cloud-ui-bin.tar.gz
进行如下检查:
LICENSE和NOTICE文件NOTICE文件中的年份正确LICENSE文件中声名license目录NOTICE文件,那么这些NOTICE文件也需要加入到版本的NOTICE文件中投票阶段
ShardingSphere社区投票,发起投票邮件到dev@shardingsphere.apache.org。PMC需要先按照文档检查版本的正确性,然后再进行投票。
经过至少72小时并统计到3个+1 PMC member票后,即可进入下一阶段的投票。
宣布投票结果,发起投票结果邮件到dev@shardingsphere.apache.org。
投票模板
标题:
[VOTE] Release Apache ShardingSphere ElasticJob UI ${RELEASE.VERSION}
正文:
Hello ShardingSphere Community,

This is a call for vote to release Apache ShardingSphere ElasticJob UI version ${RELEASE.VERSION}

Release notes:
https://github.com/apache/shardingsphere-elasticjob-ui/blob/master/RELEASE-NOTES.md

The release candidates:
https://dist.apache.org/repos/dist/dev/shardingsphere/elasticjob-ui-${RELEASE.VERSION}/

Git tag for the release:
https://github.com/apache/shardingsphere-elasticjob-ui/tree/${RELEASE.VERSION}/

Release Commit ID:
https://github.com/apache/shardingsphere-elasticjob-ui/commit/xxxxxxxxxxxxxxxxxxxxxxx

Keys to verify the Release Candidate:
https://dist.apache.org/repos/dist/dev/shardingsphere/KEYS

Look at here for how to verify this release candidate:
https://shardingsphere.apache.org/community/en/contribute/release-elasticjob-ui/

GPG user ID:
${YOUR.GPG.USER.ID}

The vote will be open for at least 72 hours or until necessary number of votes are reached.

Please vote accordingly:

[ ] +1 approve

[ ] +0 no opinion

[ ] -1 disapprove with the reason

PMC vote is +1 binding, all others is +1 non-binding.

Checklist for reference:

[ ] Download links are valid.

[ ] Checksums and PGP signatures are valid.

[ ] Source code distributions have correct names matching the current release.

[ ] LICENSE and NOTICE files are correct for each ShardingSphere repo.

[ ] All files have license headers if necessary.

[ ] No compiled archives bundled in source archive.
标题:
[RESULT][VOTE] Release Apache ShardingSphere ElasticJob UI ${RELEASE.VERSION}
正文:
We’ve received 3 +1 binding votes and one +1 non-binding vote:

+1 binding, xxx
+1 binding, xxx
+1 binding, xxx

+1 non-binding, xxx

Thank you everyone for taking the time to review the release and help us.
I will process to publish the release and send ANNOUNCE.
1. 将源码、二进制包以及KEYS从svn的dev目录移动到release目录
svn mv https://dist.apache.org/repos/dist/dev/shardingsphere/elasticjob-ui-${RELEASE.VERSION} https://dist.apache.org/repos/dist/release/shardingsphere/ -m "transfer packages for elasticjob-ui-${RELEASE.VERSION}"
svn delete https://dist.apache.org/repos/dist/release/shardingsphere/KEYS -m "delete KEYS"
svn cp https://dist.apache.org/repos/dist/dev/shardingsphere/KEYS https://dist.apache.org/repos/dist/release/shardingsphere/ -m "transfer KEYS for elasticjob-ui-${RELEASE.VERSION}"
2. 合并Github的release分支到master, 合并完成后删除release分支
git checkout master
git merge origin/${RELEASE.VERSION}-release
git pull
git push origin master
git push --delete origin ${RELEASE.VERSION}-release
git branch -d ${RELEASE.VERSION}-release
3. 发布 Docker (cloud-ui)
3.1 准备工作
本地安装 Docker,并启动服务。
3.2 编译 Docker 镜像
git checkout ${RELEASE.VERSION}
cd ~/elasticjob-ui/shardingsphere-elasticjob-ui-distribution/shardingsphere-elasticjob-cloud-ui-bin-distribution/
mvn clean package -Prelease,docker
3.3 给本地 Docker 镜像打标记
通过docker images查看到IMAGE ID,例如为:e9ea51023687
docker tag e9ea51023687 apache/shardingsphere-elasticjob-cloud-ui:latest
docker tag e9ea51023687 apache/shardingsphere-elasticjob-cloud-ui:${RELEASE.VERSION}
3.4 发布Docker镜像
docker push apache/shardingsphere-elasticjob-cloud-ui:latest
docker push apache/shardingsphere-elasticjob-cloud-ui:${RELEASE_VERSION}
3.5 确认发布成功
登录 Docker Hub 查看是否有发布的镜像
4. 发布 Docker (lite-ui)
4.1 准备工作
本地安装 Docker,并启动服务。
4.2 编译 Docker 镜像
cd ~/elasticjob-ui/shardingsphere-elasticjob-ui-distribution/shardingsphere-elasticjob-lite-ui-bin-distribution/
mvn clean package -Prelease,docker
4.3 给本地 Docker 镜像打标记
通过docker images查看到IMAGE ID,例如为:e9ea51023687
docker tag e9ea51023687 apache/shardingsphere-elasticjob-lite-ui:latest
docker tag e9ea51023687 apache/shardingsphere-elasticjob-lite-ui:${RELEASE.VERSION}
4.4 发布Docker镜像
docker login
docker push apache/shardingsphere-elasticjob-lite-ui:latest
docker push apache/shardingsphere-elasticjob-lite-ui:${RELEASE_VERSION}
4.5 确认发布成功
登录 Docker Hub 查看是否有发布的镜像
5. GitHub 版本发布
在 GitHub Releases 页面的 shardingsphere-elasticjob-ui-${RELEASE_VERSION} 版本上点击 Edit
编辑版本号及版本说明,并点击Publish release
6. 更新下载页面
等待并确认新的发布版本同步至 Apache 镜像后,更新如下页面:
https://shardingsphere.apache.org/elasticjob/current/en/downloads/
https://shardingsphere.apache.org/elasticjob/current/cn/downloads/
GPG签名文件和哈希校验文件的下载连接应该使用这个前缀: https://downloads.apache.org/shardingsphere/
最新版本中保留一个最新的版本。
7. 邮件通知版本发布完成
发送邮件到dev@shardingsphere.apache.org和announce@apache.org通知完成版本发布
通知邮件模板:
标题:
[ANNOUNCE] Apache ShardingSphere ElasticJob UI ${RELEASE.VERSION} available
正文:
Hi all,

Apache ShardingSphere Team is glad to announce the new release of Apache ShardingSphere ElasticJob UI ${RELEASE.VERSION}.

ElasticJob is a distributed scheduling solution consisting of two separate projects, ElasticJob-Lite and ElasticJob-Cloud.
Through the functions of flexible scheduling, resource management and job management, it creates a distributed scheduling solution suitable for Internet scenarios, and provides diversified job ecosystem through open architecture design. It uses a unified job API for each project. Developers only need code one time and can deploy at will.
ElasticJob became an Apache ShardingSphere Sub project on May 28 2020.

Download Links: https://shardingsphere.apache.org/elasticjob/current/en/downloads/

Release Notes: https://github.com/apache/shardingsphere-elasticjob-ui/blob/master/RELEASE-NOTES.md

Website: http://shardingsphere.apache.org/elasticjob/

ShardingSphere-ElasticJob Resources:
- Issue: https://github.com/apache/shardingsphere-elasticjob-ui/issues/
- Mailing list: dev@shardingsphere.apache.org
- Documents: https://shardingsphere.apache.org/elasticjob/current/en/overview/


- Apache ShardingSphere Team
双因子验证(2FA)是指结合密码以及实物(信用卡、SMS手机、令牌或指纹等生物标志)两种条件对用户进行认证的方法。
为保证提交者账户的安全,我们需要您在GitHub上启用2FA来验证登录用户、并贡献代码。
具体内容可参考2FA。
注意:若您不启用2FA,您将会从本项目中除名,并且无法访问我们的仓库以及来自我们私有仓库的fork仓库。
具体操作,请参考使用TOTP启用双因素认证。
当您开启2FA验证后,您需要使用用户名/密码 + 手机认证码的方式来登录GitHub。
提示:若无法通过页面链接下载对应APP,可在手机的应用市场或是APP Store里搜索并下载Google Authenticator。
当启用2FA认证后,您需要生成私有访问Token来进行git提交等操作。此时,您将使用用户名 + 私有访问Token 来代替 用户名 + 密码的方式
进行代码的提交。
具体操作,请参考创建私有Token。
Apache CLA 全称 Apache Contributor License Agreement,签署ICLA的目的是定义向ASF贡献的文档,保护知识产权,避免后续法律纠纷。ICLA在官方存档后生效,贡献者方可参与Apache项目。
当我们需要签署ICLA时步骤如下:
1. 打开链接 官网Licenses 在Contributor License Agreements 下找到CLAs并进入页面。
2. 在页面上方我们可以看到两个下载链接,选择ICLA(个人CLA)并下载文件。

3. 打开PDF,ICLA需要填写的是两个部分,均需要全英文填写。
注意事项:
- 姓名需要填写拼音,姓与名之间空一格,首字母均为大写,名在前姓氏在后。
- Committer相关的签署,则preferred Apache id(s)是必填项。
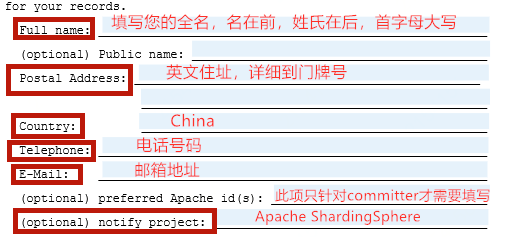
4.文件最下方的署名。
官方只接受手写或者gpg签名,这里只建议用手写的方式,可以打印文件进行手写签名或者使用电子笔进行签字。
![]()
1. 在 @private 邮件列表讨论并投票,投票由现有的 PMC 成员发起,邮件内容主要陈述提名者的活动和社区贡献。
例如:

To:private@shardingsphere.apache.org

Title: [VOTE] New committer: (提名者)

Content:

Hi, everyone

This is ^a formal vote^ about inviting (提名者) as our new committer.
He/She really made an effort to improve ShardingSphere Parser and fix many issues.
The following links will direct you to his/her work.

https://github.com/apache/shardingsphere/pull/6319
https://github.com/apache/shardingsphere/pull/6293
https://github.com/apache/shardingsphere/pull/6259
https://github.com/apache/shardingsphere/pull/6211

[^ means these words are subject to change in different case]
2. 等待 3*24h 社区 Committe r投票。
3. PMC 成员总结社区投票结果并发布邮件。
例如:

To: private@shardingsphere.apache.org

Title: [RESULT] [VOTE] New committer: (提名者)

Content:

Hi all PMCs,

I am glad to receive your votes, and the voting result is,
6   +1 votes, 0   +/-1 votes, 0   -1 votes

Therefore, I will send the invitation to (提名者).
4. 如果投票通过,对提名者发布邀请函并抄送 @private 邮件列表给发送邀请函。
To: (提名者邮箱)

cc: private@shardingsphere.apache.org

Title: Invitation to become ShardingSphere committer: (提名者)

Content:

Hello (提名者),

The ShardingSphere Project Management Committee (PMC) hereby offers you committer privileges to the project. These privileges are offered on the understanding that you'll use them reasonably and with common sense. We like to work on trust
rather than unnecessary constraints.
Being a committer enables you to more easily make changes without needing to go through the patch submission process.
Being a committer does not require you to participate any more than you already do. It does tend to make one even more committed.  You will probably find that you spend more time here.
Of course, you can decline and instead remain as a contributor, participating as you do now.
A. This personal invitation is a chance for you to accept or decline in private.  Either way, please let us know in reply to the private@shardingsphere.apache.org
address only.
B. If you accept, the next step is to register an iCLA:
    1. Details of the iCLA and the forms are found through this link: http://www.apache.org/licenses/#clas

    2. Instructions for its completion and return to the Secretary of the ASF are found at http://www.apache.org/licenses/#submitting

    3. When you transmit the completed iCLA, request to notify the Apache ShardingSphere and choose a unique Apache id. Look to see if your preferred id is already taken at http://people.apache.org/committer-index.html
This will allow the Secretary to notify the PMC when your iCLA has been recorded.
When recording of your iCLA is noticed, you will receive a follow-up message with the next steps for establishing you as a committer.

Best wishes,
(PMC)
5. 准 Committer 回复邀请函内容,回复表达同意与感谢。
6. PMC 做出回复。
Hi (提名者),

Welcome! Here are the next steps. After that we will make an announcement to the shardingsphere-dev list.

You need to send a Contributor License Agreement to the ASF. Normally you would send an Individual CLA. If you also make contributions done in work time or using work resources then see the Corporate CLA. Ask us if you have any issues.
http://www.apache.org/licenses/#clas

You need to choose a preferred ASF user name and alternatives. In order to ensure it is available you can view a list of taken ids at
http://people.apache.org/committer-index.html
Please notify us when you have submitted the CLA and by what means you did so. This will enable us to monitor its progress.

We will arrange for your Apache user account when the CLA has been recorded.

After that is done, please make follow-up replies to the shardingsphere-dev list. We generally discuss everything there and keep the private@shardingsphere.apache.org list for occasional matters which must be private.

The developer section of the website describes the roles and provides other resources:
http://www.apache.org/foundation/how-it-works.html
http://www.apache.org/dev/

The incubator also has some useful information for new committers in incubating projects:
http://incubator.apache.org/guides/committer.html

Just as before you became a committer, participation in any ASF community requires adherence to the ASF Code of Conduct:
https://www.apache.org/foundation/policies/conduct.html

Here is the guideline for all of the ShardingSphere committers:
https://shardingsphere.apache.org/community/en/contribute/committer/
7. 准 Committer 签署 iCLA 具体步骤参考签署iCLA指南。
8. 等待 Secretary 通知创建账户。
9. PMC 添加新 Committer 到 roster。
10. 新 Committer 开通 github 权限,完成Setup内容。
11. PMC 在社区宣布并欢迎新的 Committer 加入。
To: dev@shardingsphere.apache.org

Title: [ANNOUNCE] New committer: (提名者)

Content:

Hi community,

The Project Management Committee (PMC) for Apache ShardingSphere
has invited (提名者) to become a committer and we are pleased
to announce that he has accepted.

(提名者) is active in ShardingSphere community, hope see your further interactions with the community!

Thanks for your contributions.
12. 新 Commiter 更新提交者名单。
13. 如果进行 PMC 选举,需额外增加一个步骤。由投票发起人发邮件到 board@apache.org。
The Apache ShardingSphere project proposes to invite (提名者) to join the PMC.
The vote result is available here:
(投票详情链接)

Thank you,
(发起人)
