
Apache ShardingSphere 是一套开源的分布式数据库中间件解决方案组成的生态圈,它由 JDBC、Proxy 和 Sidecar(规划中)这 3 款相互独立,却又能够混合部署配合使用的产品组成。 它们均提供标准化的数据分片、分布式事务和数据库治理功能,可适用于如 Java 同构、异构语言、云原生等各种多样化的应用场景。
ShardingSphere 已于2020年4月16日成为 Apache 软件基金会的顶级项目。
Narayana简单介绍
Narayana(https://narayana.io/),是又Jboss团队提供的XA分布式事务的解决方案。
它具有以下特点:
- 标准的基于JTA实现。
- TransactionManager™ 完全去中心化设计,与业务耦合,无需单独部署。
- 事务日志支持数据库存储,支持集群模式下的事务恢复。
ShardingTransactionManager初始化XATransactionDataSource流程
ShardingSphere对XA的支持提供一整套的SPI接口,在初始化话的时候,根据事务类型,先进行TransactionManager的初始化。我们先进入org.apache.shardingsphere.transaction.xa.XAShardingTransactionManager。代码如下:
 private final Map<String, XATransactionDataSource> cachedDataSources = new HashMap<>();

    private final XATransactionManager xaTransactionManager = XATransactionManagerLoader.getInstance().getTransactionManager();

    @Override
    public void init(final DatabaseType databaseType, final Collection<ResourceDataSource> resourceDataSources) {
        for (ResourceDataSource each : resourceDataSources) {
            cachedDataSources.put(each.getOriginalName(), new XATransactionDataSource(databaseType, each.getUniqueResourceName(), each.getDataSource(), xaTransactionManager));
        }
      // Narayana的初始化
        xaTransactionManager.init();
    }
- 首先会根据配置的datasource将其转换成XATransactionDataSource,具体代码在
new XATransactionDataSource(databaseType, each.getUniqueResourceName(), each.getDataSource(), xaTransactionManager))。 我们跟进去,代码如下:
public XATransactionDataSource(final DatabaseType databaseType, final String resourceName, final DataSource dataSource, final XATransactionManager xaTransactionManager) {
        this.databaseType = databaseType;
        this.resourceName = resourceName;
        this.dataSource = dataSource;
        if (!CONTAINER_DATASOURCE_NAMES.contains(dataSource.getClass().getSimpleName())) {
            // 重点关注 1 ,返回了xaDatasource
            xaDataSource = XADataSourceFactory.build(databaseType, dataSource);
            this.xaTransactionManager = xaTransactionManager;
            // 重点关注2 注册资源
            xaTransactionManager.registerRecoveryResource(resourceName, xaDataSource);
        }
    }
- 我们重点来关注
XADataSourceFactory.build(databaseType, dataSource),从名字我们就可以看出,这应该是返回JTA规范里面的XADataSource,在ShardingSphere里面很多的功能,可以从代码风格的命名上就能猜出来,这就是优雅代码(吹一波)。不多逼逼,我们进入该方法。
public final class XADataSourceFactory {

    public static XADataSource build(final DatabaseType databaseType, final DataSource dataSource) {
        return new DataSourceSwapper(XADataSourceDefinitionFactory.getXADataSourceDefinition(databaseType)).swap(dataSource);
    }
}
- 首先又是一个SPI定义的
XADataSourceDefinitionFactory,它根据不同的数据库类型,来加载不同的方言。然后我们进入swap方法。
 public XADataSource swap(final DataSource dataSource) {
        XADataSource result = createXADataSource();
        setProperties(result, getDatabaseAccessConfiguration(dataSource));
        return result;
    }
- 很简明,第一步创建,
XADataSource,第二步给它设置属性(包含数据的连接,用户名密码等),然后返回。
Narayana 初始化过程详解
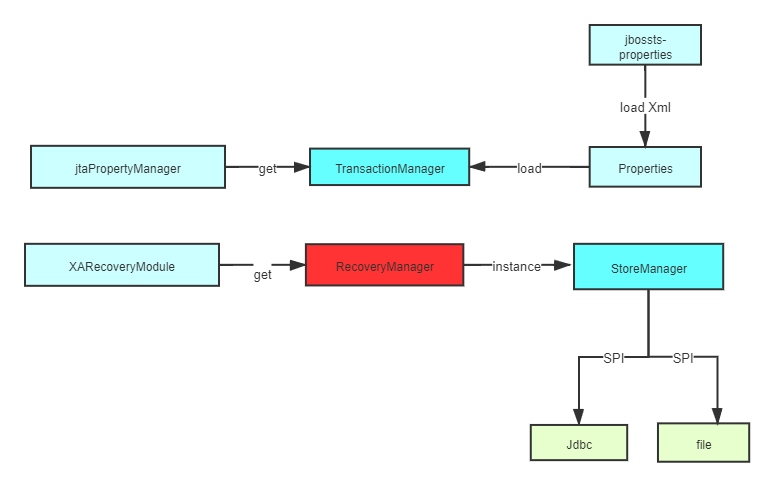
我们首先进入org.apache.shardingsphere.transaction.xa.narayana.manager.NarayanaXATransactionManager
public final class NarayanaXATransactionManager implements XATransactionManager {
    //加载transactionManger
    private final TransactionManager transactionManager = jtaPropertyManager.getJTAEnvironmentBean().getTransactionManager();

//获取事务恢复模块
    private final XARecoveryModule xaRecoveryModule = XARecoveryModule.getRegisteredXARecoveryModule();

    private final RecoveryManagerService recoveryManagerService = new RecoveryManagerService();

    @Override
    public void init() {
        RecoveryManager.delayRecoveryManagerThread();
        recoveryManagerService.create();
//开启事务恢复
        recoveryManagerService.start();
    }

    @Override
    public void registerRecoveryResource(final String dataSourceName, final XADataSource xaDataSource) {
        xaRecoveryModule.addXAResourceRecoveryHelper(new DataSourceXAResourceRecoveryHelper(xaDataSource));
    }

    @Override
    public void removeRecoveryResource(final String dataSourceName, final XADataSource xaDataSource) {
        xaRecoveryModule.removeXAResourceRecoveryHelper(new DataSourceXAResourceRecoveryHelper(xaDataSource));
    }

    @SneakyThrows({SystemException.class, RollbackException.class})
    @Override
    public void enlistResource(final SingleXAResource singleXAResource) {
        transactionManager.getTransaction().enlistResource(singleXAResource.getDelegate());
    }

    @Override
    public TransactionManager getTransactionManager() {
        return transactionManager;
    }

    @Override
    public void close() throws Exception {
        recoveryManagerService.stop();
        recoveryManagerService.destroy();
    }
}
- 首先我们关注
jtaPropertyManager.getJTAEnvironmentBean().getTransactionManager()获取TransactionManager,这是整个 Narayana初始化的核心。进入代码com.arjuna.common.internal.util.propertyservice.BeanPopulator.getNamedInstance()。
private static <T> T getNamedInstance(Class<T> beanClass, String name, Properties properties) throws RuntimeException {
        StringBuilder sb = new StringBuilder().append(beanClass.getName());
        if (name != null)
           sb.append(":").append(name);
        String key = sb.toString();
        // we don't mind sometimes instantiating the bean multiple times,
        // as long as the duplicates never escape into the outside world.
        if(!beanInstances.containsKey(key)) {
            T bean = null;
            try {
               // 初始化 JTAEnvironmentBean 这个类
                bean = beanClass.newInstance();
                if (properties != null) {
                    configureFromProperties(bean, name, properties);
                } else {
                    //初始化属性配置
                    Properties defaultProperties = PropertiesFactory.getDefaultProperties();
                    configureFromProperties(bean, name, defaultProperties);
                }
            } catch (Throwable e) {
                throw new RuntimeException(e);
            }
            beanInstances.putIfAbsent(key, bean);
        }
        return (T) beanInstances.get(key);
    }
- 我们重点关注
Properties defaultProperties = PropertiesFactory.getDefaultProperties();。最后会进入com.arjuna.common.util.propertyservice.AbstractPropertiesFactory.getPropertiesFromFile()。
 public Properties getPropertiesFromFile(String propertyFileName, ClassLoader classLoader) {
        String propertiesSourceUri = null;
        try
        {
            // 文件名称为:jbossts-properties.xml 加载顺序为:This is the point where the search path is applied - user.dir (pwd), user.home, java.home, classpath
            propertiesSourceUri = com.arjuna.common.util.propertyservice.FileLocator.locateFile(propertyFileName, classLoader);
        }
        catch(FileNotFoundException fileNotFoundException)
        {
            // try falling back to a default file built into the .jar
            // Note the default- prefix on the name, to avoid finding it from the .jar at the previous stage
            // in cases where the .jar comes before the etc dir on the classpath.
            URL url = AbstractPropertiesFactory.class.getResource("/default-"+propertyFileName);
            if(url == null) {            commonLogger.i18NLogger.warn_could_not_find_config_file(url);
            } else {
                propertiesSourceUri = url.toString();
            }
        }
        catch (IOException e)
        {
            throw new RuntimeException("invalid property file "+propertiesSourceUri, e);
        }
        Properties properties = null;
        try {
            if (propertiesSourceUri != null) {
               //加载配置文件
                properties = loadFromFile(propertiesSourceUri);
            }
            // 叠加系统配置属性
            properties = applySystemProperties(properties);
        } catch(Exception e) {
            throw new RuntimeException("unable to load properties from "+propertiesSourceUri, e);
        }
        return properties;
    }
- 加载文件名称为
jbossts-properties.xml, 加载路径优先级别为 :user.dir > user.home >java.home >classpath。 最后再叠加上系统属性,然后返回。
我们再来看一下 jbossts-properties.xml的参考格式如下:
<properties>
    <entry key="CoordinatorEnvironmentBean.commitOnePhase">YES</entry>
    <entry key="ObjectStoreEnvironmentBean.objectStoreType">com.arjuna.ats.internal.arjuna.objectstore.jdbc.JDBCStore</entry>
    <entry key="ObjectStoreEnvironmentBean.jdbcAccess">com.arjuna.ats.internal.arjuna.objectstore.jdbc.accessors.DynamicDataSourceJDBCAccess;ClassName=com.mysql.jdbc.jdbc2.optional.MysqlDataSource;DatabaseName=jbossts;ServerName=172.25.4.62;PortNumber=3306;User=j_jbossts;Password=9MfNHoRncCi8</entry>
    <entry key="ObjectStoreEnvironmentBean.tablePrefix">Action</entry>
    <entry key="ObjectStoreEnvironmentBean.dropTable">true</entry>
    <entry key="ObjectStoreEnvironmentBean.stateStore.objectStoreType">com.arjuna.ats.internal.arjuna.objectstore.jdbc.JDBCStore</entry>
    <entry key="ObjectStoreEnvironmentBean.stateStore.jdbcAccess">com.arjuna.ats.internal.arjuna.objectstore.jdbc.accessors.DynamicDataSourceJDBCAccess;ClassName=com.mysql.jdbc.jdbc2.optional.MysqlDataSource;DatabaseName=jbossts;ServerName=172.25.4.62;PortNumber=3306;User=j_jbossts;Password=9MfNHoRncCi8</entry>
    <entry key="ObjectStoreEnvironmentBean.stateStore.tablePrefix">stateStore</entry>
    <entry key="ObjectStoreEnvironmentBean.stateStore.dropTable">true</entry>
    <entry key="ObjectStoreEnvironmentBean.communicationStore.objectStoreType">com.arjuna.ats.internal.arjuna.objectstore.jdbc.JDBCStore</entry>
    <entry key="ObjectStoreEnvironmentBean.communicationStore.jdbcAccess">com.arjuna.ats.internal.arjuna.objectstore.jdbc.accessors.DynamicDataSourceJDBCAccess;ClassName=com.mysql.jdbc.jdbc2.optional.MysqlDataSource;DatabaseName=jbossts;ServerName=172.25.4.62;PortNumber=3306;User=j_jbossts;Password=9MfNHoRncCi8</entry>
    <entry key="ObjectStoreEnvironmentBean.communicationStore.tablePrefix">Communication</entry>
    <entry key="ObjectStoreEnvironmentBean.communicationStore.dropTable">true</entry>
    <entry key="ObjectStoreEnvironmentBean.transactionSync">ON</entry>
    <entry key="CoreEnvironmentBean.nodeIdentifier">1</entry>
    <entry key="JTAEnvironmentBean.xaRecoveryNodes">1</entry>
    <entry key="JTAEnvironmentBean.xaResourceOrphanFilterClassNames">
        com.arjuna.ats.internal.jta.recovery.arjunacore.JTATransactionLogXAResourceOrphanFilter
        com.arjuna.ats.internal.jta.recovery.arjunacore.JTANodeNameXAResourceOrphanFilter
        com.arjuna.ats.internal.jta.recovery.arjunacore.JTAActionStatusServiceXAResourceOrphanFilter
    </entry>
    <entry key="CoreEnvironmentBean.socketProcessIdPort">0</entry>
    <entry key="RecoveryEnvironmentBean.recoveryModuleClassNames">
        com.arjuna.ats.internal.arjuna.recovery.AtomicActionRecoveryModule
        com.arjuna.ats.internal.jta.recovery.arjunacore.XARecoveryModule
    </entry>
    <entry key="RecoveryEnvironmentBean.expiryScannerClassNames">
        com.arjuna.ats.internal.arjuna.recovery.ExpiredTransactionStatusManagerScanner
    </entry>
    <entry key="RecoveryEnvironmentBean.recoveryPort">4712</entry>
    <entry key="RecoveryEnvironmentBean.recoveryAddress"></entry>
    <entry key="RecoveryEnvironmentBean.transactionStatusManagerPort">0</entry>
    <entry key="RecoveryEnvironmentBean.transactionStatusManagerAddress"></entry>
    <entry key="RecoveryEnvironmentBean.recoveryListener">NO</entry>
    <entry key="RecoveryEnvironmentBean.recoveryBackoffPeriod">1</entry>
</properties>
它被视为标准java.util.Properties文件的XML格式并按需加载。entry名称的形式为:类名.属性名。提供的配置类都在com.arjuna.ats.arjuna.common包下,以bean结尾的实体类。
- 文件加载后,它会被缓存,直到JVM重新启动才重新读取。对属性文件的更改需要重新启动才能生效
- 在属性加载之后,将检查EnvironmentBean,对于每个字段,如果属性在搜索顺序中包含如下匹配的键,则使用属性的值调用该字段的setter方法,或者使用不同的系统属性调用该字段的setter方法。
- 然后将bean返回给调用者,调用者可以通过调用setter方法进一步覆盖值。
我们返回主线:现在已经加载了配置。接下来就是执行configureFromProperties(bean, name, defaultProperties); 。就是利用反射机制初始化对象,以及给对象的属性赋值。代码如下:
public static void configureFromProperties(Object bean, String instanceName, Properties properties) throws Exception {
       for(Field field : bean.getClass().getDeclaredFields()) {
            Class type = field.getType();
            String setterMethodName = "set"+capitalizeFirstLetter(field.getName());
            Method setter;
            try {
                setter = bean.getClass().getMethod(setterMethodName, new Class[] {field.getType()});
            } catch(NoSuchMethodException e) {
                continue; // emma code coverage tool adds fields to instrumented classes - ignore them.
            }
            String getterMethodName;
            Method getter = null;
            if(field.getType().equals(Boolean.TYPE)) {
                getterMethodName = "is"+capitalizeFirstLetter(field.getName());
                try {
                    getter = bean.getClass().getMethod(getterMethodName, new Class[] {});
                } catch (NoSuchMethodException e) {}
            }
            if(getter == null) {
                getterMethodName = "get"+capitalizeFirstLetter(field.getName());
                getter = bean.getClass().getMethod(getterMethodName, new Class[] {});
            }
            if(field.isAnnotationPresent(ConcatenationPrefix.class) || field.getType().getName().startsWith("java.util")) {
                handleGroupProperty(bean, instanceName, properties, field, setter, getter);
            } else {
                handleSimpleProperty(bean, instanceName, properties, field, setter, getter);
            }
        }
    }
我们在回到 NarayanaXATransactionManager,分析 XARecoveryModule.getRegisteredXARecoveryModule();代码如下 :
    public static XARecoveryModule getRegisteredXARecoveryModule () {
         if (registeredXARecoveryModule == null) {
//获取事务恢复manager
            RecoveryManager recMan = RecoveryManager.manager();
            Vector recoveryModules = recMan.getModules();

            if (recoveryModules != null) {
                Enumeration modules = recoveryModules.elements();

                while (modules.hasMoreElements()) {
                    RecoveryModule m = (RecoveryModule) modules.nextElement();

                    if (m instanceof XARecoveryModule) {
                        registeredXARecoveryModule = (XARecoveryModule) m;
                        break;
                    }
                }
            }
        }
        return registeredXARecoveryModule;
    }
- 重点关注获取
RecoveryManager.manager();, 最后会进入com.arjuna.ats.internal.arjuna.recovery.RecoveryManagerImple的构造方法,代码如下:
       //省略了相关无用代码
      // start the activator recovery loader 加载事务恢复
        _recActivatorLoader = new RecActivatorLoader();
        _recActivatorLoader.startRecoveryActivators();

        // start the periodic recovery thread
        // (don't start this until just about to go on to the other stuff)
         //进行初始化
        _periodicRecovery = new PeriodicRecovery(threaded, useListener);

        /*
         * Start the expiry scanner
         *
         * This has to happen after initiating periodic recovery, because periodic recovery registers record types used
         * by the expiry scanner
         */
        ExpiredEntryMonitor.startUp();
- 重点关注
new PeriodicRecovery(threaded, useListener);,会进行恢复模块的加载,最后会进入com.arjuna.ats.internal.arjuna.recovery.AtomicActionRecoveryModule的构造方法。
 public AtomicActionRecoveryModule()
   {
       if (tsLogger.logger.isDebugEnabled()) {
           tsLogger.logger.debug("AtomicActionRecoveryModule created");
       }
      if (_recoveryStore == null)
      {
         _recoveryStore = StoreManager.getRecoveryStore();
      }
      _transactionStatusConnectionMgr = new TransactionStatusConnectionManager() ;
   }
-
StoreManager.getRecoveryStore();,最后会进入com.arjuna.ats.arjuna.objectstore.StoreManager.initStore(),进入事务日志的初始化。代码如下:
private static final ObjectStoreAPI initStore(String name)
    {
        ObjectStoreEnvironmentBean storeEnvBean = BeanPopulator.getNamedInstance(ObjectStoreEnvironmentBean.class, name);
//获取事务存储类型,支持的类名,默认使用 ShadowNoFileLockStore 来存储
 String storeType = storeEnvBean.getObjectStoreType();
        ObjectStoreAPI store;

        try
        {
//进行SPI初始化加载
            store = ClassloadingUtility.loadAndInstantiateClass(ObjectStoreAPI.class, storeType, name);
        }
        catch (final Throwable ex)
        {
            throw new FatalError(tsLogger.i18NLogger.get_StoreManager_invalidtype() + " " + storeType, ex);
        }
        //进行初始化
        store.start();

        return store;
    }
- 整个方法是比较清楚的,首先获取事务日志存储的类型(默认使用file模式),然后进行SPI初始化加载,最后再初始化。
- storeType 这里如果配置的是
com.arjuna.ats.internal.arjuna.objectstore.jdbc.JDBCStore,那么就会进入这个类的构造方法,来进行初始化。代码如下:
//省略无关代码
 try {
                StringTokenizer stringTokenizer = new StringTokenizer(connectionDetails, ";");
     //初始化jdbcAccess ,用来初始化
                JDBCAccess jdbcAccess = (JDBCAccess) Class.forName(stringTokenizer.nextToken()).newInstance();
//进行jdbc连接,datasource的初始化
                jdbcAccess.initialise(stringTokenizer);

                _storeName = jdbcAccess.getClass().getName() + ":" + tableName;

                Connection connection = jdbcAccess.getConnection();
                String name;
                int major;
                int minor;
                try {
                    DatabaseMetaData md = connection.getMetaData();
                    name = md.getDriverName();
                    major = md.getDriverMajorVersion();
                    minor = md.getDriverMinorVersion();
                } finally {
                    connection.close();
                }

                /*
                 * Check for spaces in the name - our implementation classes are
                 * always just the first part of such names.
                 */

                int index = name.indexOf(' ');

                if (index != -1)
                    name = name.substring(0, index);

                name = name.replaceAll("-", "_");

                name = name.toLowerCase();

                final String packagePrefix = JDBCStore.class.getName().substring(0, JDBCStore.class.getName().lastIndexOf('.')) + ".drivers.";
                Class jdbcImpleClass = null;
                try {
                    jdbcImpleClass = Class.forName(packagePrefix + name + "_" + major + "_" + minor + "_driver");
                } catch (final ClassNotFoundException cnfe) {
                    try {
                        jdbcImpleClass = Class.forName(packagePrefix + name + "_" + major + "_driver");
                    } catch (final ClassNotFoundException cnfe2) {
                        jdbcImpleClass = Class.forName(packagePrefix + name + "_driver");
                    }
                }
                _theImple = (com.arjuna.ats.internal.arjuna.objectstore.jdbc.JDBCImple_driver) jdbcImpleClass.newInstance();
                //使用不同的数据库类型来初始化
                _theImple.initialise(jdbcAccess, tableName, jdbcStoreEnvironmentBean);
                imples.put(key, _theImple);
                storeNames.put(key, _storeName);
            } catch (Exception e) {
                tsLogger.i18NLogger.fatal_objectstore_JDBCStore_2(_storeName, e);
                throw new ObjectStoreException(e);
            }
        }
- 这个方法还是比较清晰的,根据我们的jdbc的配置,首先初始化连接信息。然后获取连接,然后根据不同的数据库类型,来进行初始化。 我们来关心下
_theImple.initialise(jdbcAccess, tableName, jdbcStoreEnvironmentBean);。代码如下:
public void initialise(final JDBCAccess jdbcAccess, String tableName,
            ObjectStoreEnvironmentBean jdbcStoreEnvironmentBean)
            throws SQLException, NamingException {
        this.jdbcAccess = jdbcAccess;
        try (Connection connection = jdbcAccess.getConnection()) {
            try (Statement stmt = connection.createStatement()) {
                // table [type, object UID, format, blob]
//初始化是否是否需要删除表
                if (jdbcStoreEnvironmentBean.getDropTable()) {
                    try {
                        stmt.executeUpdate("DROP TABLE " + tableName);
                    } catch (SQLException ex) {
                        checkDropTableException(connection, ex);
                    }
                }
        //是否需要创建表
                if (jdbcStoreEnvironmentBean.getCreateTable()) {
                    try {
                        createTable(stmt, tableName);
                    } catch (SQLException ex) {
                        checkCreateTableError(ex);
                    }
                }

                // This can be the case when triggering via EmptyObjectStore
                if (!connection.getAutoCommit()) {
                    connection.commit();
                }
            }
        }

        this.tableName = tableName;
    }
- 框架会自动的创建事务日志表来进行存储,所以我们不需要手动创建,也不要惊讶这个表是从哪里来的。创建的表的代码如下:
protected void createTable(Statement stmt, String tableName)
            throws SQLException {
        String statement = "CREATE TABLE "
                + tableName
                + " (StateType INTEGER NOT NULL, Hidden INTEGER NOT NULL, "
                + "TypeName VARCHAR(255) NOT NULL, UidString VARCHAR(255) NOT NULL, ObjectState "
                + getObjectStateSQLType()
                + ", PRIMARY KEY(UidString, TypeName, StateType))";
        stmt.executeUpdate(statement);
    }
- 我们在回到主线
PeriodicRecovery,这个类是继承Thread,调用start就会执行run方法,他会对控制需要进行恢复的事务线程,真的当前的事务状态进行处理,到底是阻塞,还是唤醒。 - 初始化流程中,还有一步是进行事务恢复的,这个我们在后续的章节,单独拿出来进行讲解。
NarayanaXA分布式事务begin流程
我们知道,本地的事务,都会有一个 trainsaction.begin, 对应XA分布式事务来说也不另外,我们再把思路切换回XAShardingTransactionManager.begin(), 会调用com.arjuna.ats.internal.jta.transaction.arjunacore.BaseTransaction.begin() 方法。代码如下:
        //检查事务状态
        checkTransactionState();
        //获取超时配置,超时很重要
        Iteger value = _timeouts.get();
        int v = 0; // if not set then assume 0. What else can we do?
        if (value != null)
        {
            v = value.intValue();
        }
        else
            v = TxControl.getDefaultTimeout();

        // TODO set default timeout
                //初始化事务实现
        TransactionImple.putTransaction(new TransactionImple(v));
- 初始化流程主要就是检查事务状态,获取超时时间,最后也是最重要的创建事务实现。
new TransactionImple(v)。我们进入该类的构造方法,代码如下:
public TransactionImple(int timeout)
    {
//创建事务执行action
        _theTransaction = new AtomicAction();
//开启事务
        _theTransaction.begin(timeout);

        _resources = new Hashtable();
        _duplicateResources = new Hashtable();
        _suspendCount = 0;
        _xaTransactionTimeoutEnabled = getXATransactionTimeoutEnabled();

        _txLocalResources = Collections.synchronizedMap(new HashMap());
    }
- 这里面最重要是2步,第一步是初始化 AtomicAction,第二步是 AtomicAction.begin()。我们先来看
new AtomicAction。会对相关的父类,进行初始化。AtomicAction的继承体系图为:

- 我们接下来看
com.arjuna.ats.arjuna.AtomicAction.begin()。代码如下:
public int begin (int timeout)
    {
               //进行start,最关键
        int status = super.start();
        if (status == ActionStatus.RUNNING)
        {
            /*
             * Now do thread/action tracking.
             */
//放入threadlocal里面
            ThreadActionData.pushAction(this);
            _timeout = timeout;
            if (_timeout == 0)
                _timeout = TxControl.getDefaultTimeout();

            if (_timeout > 0)
        //设置事务超时控制,很重要
              TransactionReaper.transactionReaper().insert(this, _timeout);
        }
        return status;
    }
- 我们先来分析
super.start()。最后会进入com.arjuna.ats.arjuna.coordinator.BasicAction.begin()。代码如下:
  //省略很多代码
//进行action的一些初始化工作
  actionInitialise(parentAct);
XATransactionDataSource getConnection() 流程
我们都知道想要执行SQL语句,必须要获取到数据库的connection。让我们再回到 XAShardingTransactionManager.getConnection() 最后会调用到org.apache.shardingsphere.transaction.xa.jta.datasourceXATransactionDataSource.getConnection()。流程图如下:
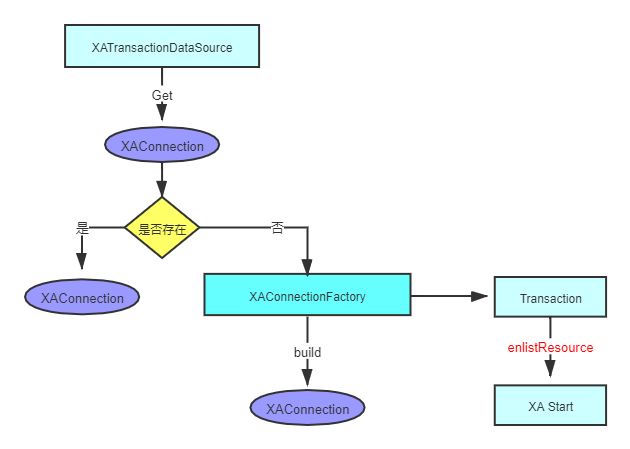
代码 :
 public Connection getConnection() throws SQLException, SystemException, RollbackException {
      //先检查是否已经有存在的connection,这一步很关心,也是XA的关键,因为XA事务,必须在同一个connection
        if (CONTAINER_DATASOURCE_NAMES.contains(dataSource.getClass().getSimpleName())) {
            return dataSource.getConnection();
        }
      //获取数据库连接
        Connection result = dataSource.getConnection();
      //转成XAConnection,其实是同一个连接
        XAConnection xaConnection = XAConnectionFactory.createXAConnection(databaseType, xaDataSource, result);
      //获取JTA事务定义接口
        Transaction transaction = xaTransactionManager.getTransactionManager().getTransaction();
        if (!enlistedTransactions.get().contains(transaction)) {
      //进行资源注册
            transaction.enlistResource(new SingleXAResource(resourceName, xaConnection.getXAResource()));
            transaction.registerSynchronization(new Synchronization() {
                @Override
                public void beforeCompletion() {
                    enlistedTransactions.get().remove(transaction);
                }

                @Override
                public void afterCompletion(final int status) {
                    enlistedTransactions.get().clear();
                }
            });
            enlistedTransactions.get().add(transaction);
        }
        return result;
    }
- 首先第一步很关心,尤其是对shardingsphere来说,因为在一个事务里面,会有多个SQL语句,打到相同的数据库,所以对相同的数据库,必须获取同一个XAConnection,这样才能进行XA事务的提交与回滚。
- 我们接下来关心
transaction.enlistResource(new SingleXAResource(resourceName, xaConnection.getXAResource()));, 会进入com.arjuna.ats.internal.jta.transaction.arjunacore.TransactionImp.enlistResource(), 代码太长,截取一部分。
 // Pay attention now, this bit is hairy. We need to add a new AbstractRecord (XAResourceRecord)
                        // to the BasicAction, which will thereafter drive its completion. However, the transaction
                        // core is not directly XA aware, so it's our job to start the XAResource. Problem is, if
                        // adding the record fails, BasicAction will never end the resource via the XAResourceRecord,
                        // so we must do so directly.  start may fail due to dupl xid or other reason, and transactions
                        // may rollback async, for which reasons we can't call add before start.
                        // The xid will change on each pass of the loop, so we need to create a new record on each pass.
                        // The add will fail in the case of multiple last resources being disallowed
                        // see JBTM-362 and JBTM-363
                        AbstractRecord abstractRecord = createRecord(xaRes, params, xid);
                        if(abstractRecord != null) {
                            xaRes.start(xid, xaStartNormal);
                            if(_theTransaction.add(abstractRecord) == AddOutcome.AR_ADDED) {
                                _resources.put(xaRes, new TxInfo(xid));
                                return true; // dive out, no need to set associatedWork = true;
                            } else {
                                // we called start on the resource, but _theTransaction did not accept it.
                                // we therefore have a mess which we must now clean up by ensuring the start is undone:
                                abstractRecord.topLevelAbort();
                            }
                        }
- 哦多尅,看见了吗,各位,看见了
xaRes.start(xid, xaStartNormal);了吗????,我们进去,假设我们使用的Mysql数据库:
 public void start(Xid xid, int flags) throws XAException {
        StringBuilder commandBuf = new StringBuilder(300);
        commandBuf.append("XA START ");
        appendXid(commandBuf, xid);
        switch(flags) {
        case 0:
            break;
        case 2097152:
            commandBuf.append(" JOIN");
            break;
        case 134217728:
            commandBuf.append(" RESUME");
            break;
        default:
            throw new XAException(-5);
        }

        this.dispatchCommand(commandBuf.toString());
        this.underlyingConnection.setInGlobalTx(true);
    }
- 组装
XA start XidSQL语句,进行执行。
到这里,我们总结下,在获取数据库连接的时候,我们执行了XA协议接口中的 XA start xid
Narayana commit流程源码分析
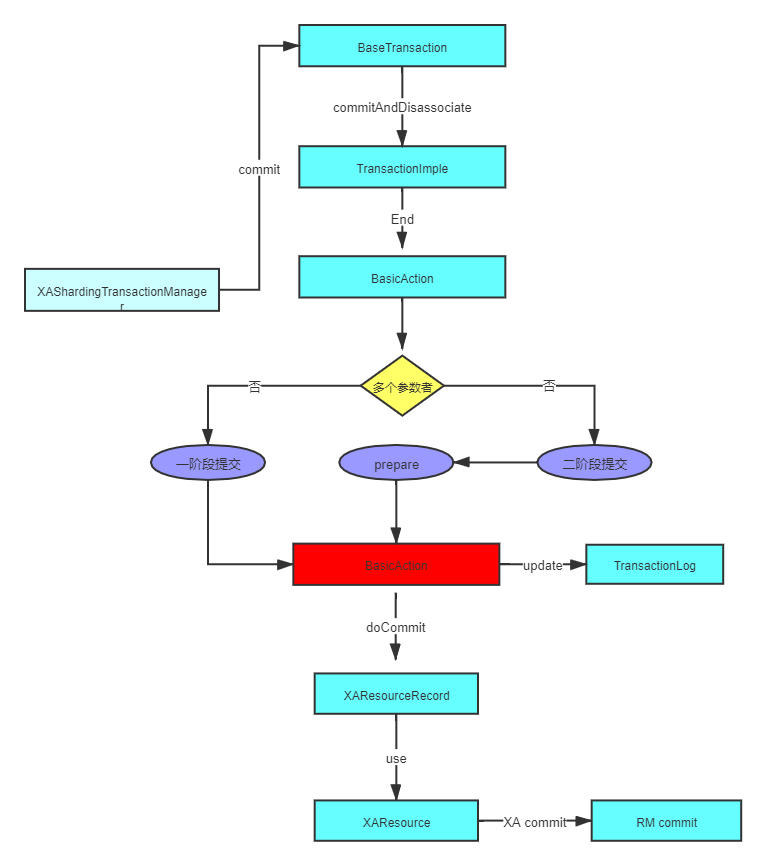
我们进入com.arjuna.ats.internal.jta.transaction.arjunacore.BaseTransaction.commit() 方法,代码如下:
//获取当前事务
    TransactionImple theTransaction = TransactionImple.getTransaction();

        if (theTransaction == null)
            throw new IllegalStateException(
                    "BaseTransaction.commit - "
                            + jtaLogger.i18NLogger.get_transaction_arjunacore_notx());
                 //进行事务提交
        theTransaction.commitAndDisassociate();
- 我们重点来关注
theTransaction.commitAndDisassociate();,最后进入com.arjuna.ats.arjuna.AtomicAction.commit()代码如下:
public int commit (boolean report_heuristics)
    {
                 //进行事务提交
        int status = super.end(report_heuristics);
        /*
         * Now remove this thread from the action state.
         */
               //清空数据
        ThreadActionData.popAction();
        TransactionReaper.transactionReaper().remove(this);
        return status;
    }

感谢支持 OpenSEC